VANITY MIRROR ILLUMINATION REMOVAL/INSTALLATION


id091800820100

1.  Disconnect the negative battery terminal. (See NEGATIVE BATTERY TERMINAL DISCONNECTION/CONNECTION.)

2.  Remove the following parts.

1.  Sunroof seaming welt (with sunroof system) (See SUNROOF UNIT REMOVAL/INSTALLATION.)
2.  A-pillar trim (See A-PILLAR TRIM REMOVAL/INSTALLATION.)
3.  Front map light (See FRONT MAP LIGHT REMOVAL/INSTALLATION.)
4.  Sunvisor (See SUNVISOR REMOVAL/INSTALLATION.)
5.  Lower decoration panel (with center display) (See DECORATION PANEL REMOVAL/INSTALLATION.)
6.  Front scuff plate (See FRONT SCUFF PLATE REMOVAL/INSTALLATION.)
7.  Passenger-side front side trim (with center display) (See FRONT SIDE TRIM REMOVAL/INSTALLATION.)
8.  Glove compartment (with center display) (See GLOVE COMPARTMENT REMOVAL/INSTALLATION.)
9.  Dashboard under cover (with center display) (See DASHBOARD UNDER COVER REMOVAL/INSTALLATION.)
10.  Passenger-side lower panel (with center display) (See LOWER PANEL REMOVAL/INSTALLATION.)
11.  Assist handle (See ASSIST HANDLE REMOVAL/INSTALLATION.)
12.  Rear scuff plate (See REAR SCUFF PLATE REMOVAL/INSTALLATION.)
13.  B-pillar lower trim (See B-PILLAR LOWER TRIM REMOVAL/INSTALLATION.)
14.  Adjust anchor cover on the front seat belt (See FRONT SEAT BELT REMOVAL/INSTALLATION.)
15.  Upper anchor installation bolt on the front seat belt (See FRONT SEAT BELT REMOVAL/INSTALLATION.)
16.  B-pillar upper trim (See B-PILLAR UPPER TRIM REMOVAL/INSTALLATION.)
17.  Rear seat cushion (See REAR SEAT CUSHION REMOVAL/INSTALLATION.)
18.  Trunk board (See TRUNK BOARD REMOVAL/INSTALLATION.)
19.  Bass-box (with Bose®) (See BASS-BOX REMOVAL/INSTALLATION.)
20.  Sub-trunk (See SUB-TRUNK REMOVAL/INSTALLATION.)
21.  Trunk end trim (See TRUNK END TRIM REMOVAL/INSTALLATION.)
22.  Trunk side trim (See TRUNK SIDE TRIM REMOVAL/INSTALLATION.)
23.  C-pillar trim (See C-PILLAR TRIM REMOVAL/INSTALLATION.)
24.  Headliner (See HEADLINER REMOVAL/INSTALLATION.)

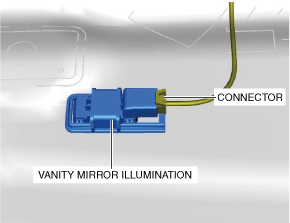
3.  Disconnect the connector.

am6xuw00011378

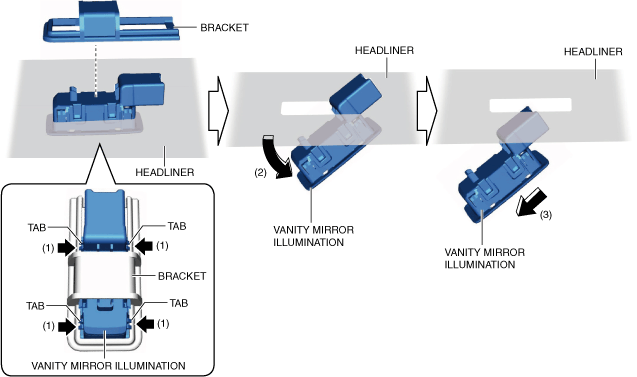
4.  Remove the bracket while pressing the vanity mirror illumination tabs (1).

Caution
•  If the vanity mirror illumination is removed from the bracket, the vanity mirror illumination may fall off and be damaged. When removing the vanity mirror illumination from the bracket, hold the vanity mirror illumination on the lens side with a hand during servicing.
am6xuw00011379

5.  Move the vanity mirror illumination in the direction of the arrow (2), (3) and remove the vanity mirror illumination from the headliner.

6.  Install in the reverse order of removal.