PASSENGER COMPARTMENT TEMPERATURE SENSOR REMOVAL/INSTALLATION [FULL-AUTO AIR CONDITIONER]
id0740a1703800
-
Warning
-
1. Remove the selector lever knob. (See SELECTOR LEVER REMOVAL/INSTALLATION [A71M].)
2. Disconnect the negative lead-acid battery terminal and wait for 1 min or more. (See NEGATIVE LEAD-ACID BATTERY TERMINAL DISCONNECTION/CONNECTION.)
3. Remove the following parts:
- (1) Shift panel (See SHIFT PANEL REMOVAL/INSTALLATION.)
-
- (2) Console panel (See CONSOLE PANEL REMOVAL/INSTALLATION.)
-
- (3) Rear console (See REAR CONSOLE REMOVAL/INSTALLATION.)
-
- (4) Console bracket (See CONSOLE BRACKET REMOVAL/INSTALLATION.)
-
- (5) Front console upper panel (See FRONT CONSOLE UPPER PANEL REMOVAL/INSTALLATION.)
-
- (6) Console side panel (See CONSOLE SIDE PANEL REMOVAL/INSTALLATION.)
-
- (7) Front console box (See FRONT CONSOLE BOX REMOVAL/INSTALLATION.)
-
- (8) Side wall (See SIDE WALL REMOVAL/INSTALLATION.)
-
- (9) Front console (See FRONT CONSOLE REMOVAL/INSTALLATION.)
-
- (10) Passenger-side decoration panel (See DECORATION PANEL REMOVAL/INSTALLATION.)
-
- (11) Driver-side scuff plate (See SCUFF PLATE REMOVAL/INSTALLATION.)
-
- (12) Driver-side front side trim (See FRONT SIDE TRIM REMOVAL/INSTALLATION.)
-
- (13) Driver-side lower panel (See DRIVER-SIDE LOWER PANEL REMOVAL/INSTALLATION.)
-
- (14) Knee air bag module(See KNEE AIR BAG MODULE REMOVAL/INSTALLATION [TWO-STEP DEPLOYMENT CONTROL SYSTEM (E)].)
-
- (15) Center lower panel (See CENTER LOWER PANEL REMOVAL/INSTALLATION.)
-
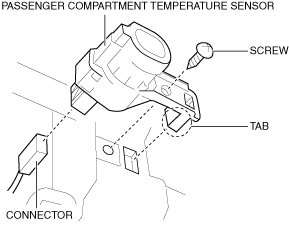
4. Remove the screw.
5. Detach the tab of the passenger compartment temperature sensor from the dashboard.
6. Remove the passenger compartment temperature sensor.
7. Disconnect the connector.
8. Install in the reverse order of removal.