SUNROOF UNIT REMOVAL/INSTALLATION
id091500700600
1. Disconnect the negative lead-acid battery terminal. (See NEGATIVE LEAD-ACID BATTERY TERMINAL DISCONNECTION/CONNECTION.)
2. Remove the following parts:
- (1) Front map light(See FRONT MAP LIGHT REMOVAL/INSTALLATION [(E)].)
-
- (2) Sensor cover (See SENSOR COVER REMOVAL/INSTALLATION.)
-
- (3) Sunvisor (See SUNVISOR REMOVAL/INSTALLATION.)
-
- (4) Assist handle (See ASSIST HANDLE REMOVAL/INSTALLATION.)
-
- (5) Front pillar trim (See FRONT PILLAR TRIM REMOVAL/INSTALLATION.)
-
- (6) Roof side trim (See ROOF SIDE TRIM REMOVAL/INSTALLATION.)
-
- (7) Rear package tray (See REAR PACKAGE TRAY REMOVAL/INSTALLATION.)
-
- (8) Trunk side upper trim (See TRUNK SIDE UPPER TRIM REMOVAL/INSTALLATION.)
-
- (9) Rear pillar trim (See REAR PILLAR TRIM REMOVAL/INSTALLATION.)
-
- (10) Headliner (See HEADLINER REMOVAL/INSTALLATION.)
-
- (11) Glass panel (See GLASS PANEL REMOVAL/INSTALLATION.)
-
3. Disconnect the sunroof motor connector. (See SUNROOF MOTOR REMOVAL/INSTALLATION.)
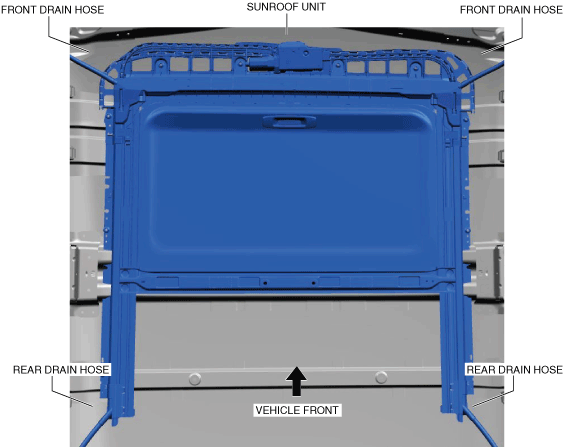
4. Disconnect the front drain hose and rear drain hose from the sunroof unit.
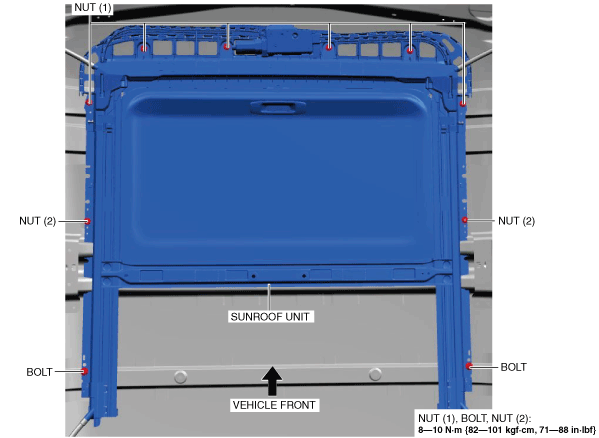
5. Remove nuts (1).
6. Remove the bolts.
7. Remove nuts (2).
-
Warning
-
• If the bolts and nuts are removed without supporting the sunroof unit, the sunroof unit may fall and cause injury. Support the sunroof unit before removing the bolts and nuts and always perform the procedure with at least one other person to prevent the sunroof unit from falling.
8. Remove the sunroof unit from the driver-side or passenger-side front door.
9. Install in the reverse order of removal.