AUTO LEVELING CONTROL MODULE REMOVAL/INSTALLATION [(E)]
id0918007023x2
-
Note
-
• The auto leveling control module stores the vehicle attitude angle from the auto leveling control module internal sensor when the headlight auto leveling system initial setting is performed after the auto leveling control module is replaced.
• The vehicle attitude angle recorded by the auto leveling control module is not cleared even if the lead-acid battery is disconnected.
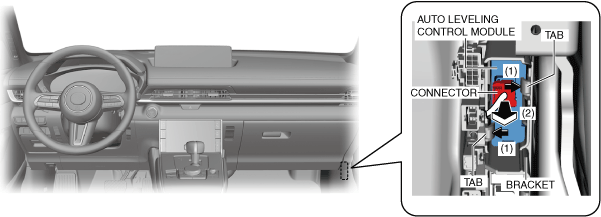
L.H.D.
1. Remove the selector lever knob. (See SELECTOR LEVER REMOVAL/INSTALLATION [A71M].)
2. Disconnect the negative lead-acid battery terminal. (See NEGATIVE LEAD-ACID BATTERY TERMINAL DISCONNECTION/CONNECTION.)
3. Remove the following parts.
- (1) Shift panel (See SHIFT PANEL REMOVAL/INSTALLATION.)
-
- (2) Console panel (See CONSOLE PANEL REMOVAL/INSTALLATION.)
-
- (3) Passenger's decoration panel (See DECORATION PANEL REMOVAL/INSTALLATION.)
-
- (4) Passenger's scuff plate (See SCUFF PLATE REMOVAL/INSTALLATION.)
-
- (5) Passenger's front side trim (See FRONT SIDE TRIM REMOVAL/INSTALLATION.)
-
- (6) Glove compartment (See GLOVE COMPARTMENT REMOVAL/INSTALLATION [(E)].)
-
- (7) Dashboard under cover (See DASHBOARD UNDER COVER REMOVAL/INSTALLATION.)
-
- (8) Passenger-side lower panel (See PASSENGER-SIDE LOWER PANEL REMOVAL [(E)].) (See PASSENGER-SIDE LOWER PANEL INSTALLATION [(E)].)
-
4. While pressing the bracket tabs in the direction of arrows (1) shown in the figure, pull the auto leveling control module connector in the direction of arrow (2) and pull out the auto leveling control module from the bracket.
5. Disconnect the connector and remove the auto leveling control module.
6. Install in the reverse order of removal.
7. If the auto leveling control module is replaced, perform the following procedure.
- (1) Switch the main power ON (READY off) to complete the global central configuration (GCC) for the auto leveling control module.
-
- (2) Clear the DTC. (See CLEARING DTC.)
-
- (3) Perform the headlight auto leveling system initialization. (See HEADLIGHT AUTO LEVELING SYSTEM INITIALIZATION.)
-
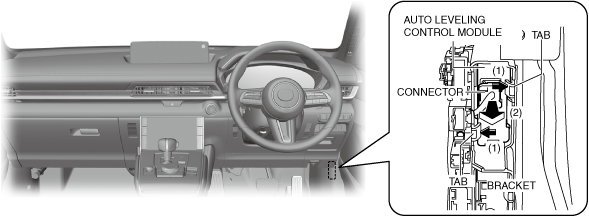
R.H.D.
1. Remove the select lever knob. (See SELECTOR LEVER REMOVAL/INSTALLATION [A71M].)
2. Disconnect the negative lead-acid battery terminal. (See NEGATIVE LEAD-ACID BATTERY TERMINAL DISCONNECTION/CONNECTION.)
3. Remove the following parts:
- (1) Shift panel (See SHIFT PANEL REMOVAL/INSTALLATION.)
-
- (2) Console panel (See CONSOLE PANEL REMOVAL/INSTALLATION.)
-
- (3) Passenger-side decoration panel (See DECORATION PANEL REMOVAL/INSTALLATION.)
-
- (4) driver-side scuff plate (See SCUFF PLATE REMOVAL/INSTALLATION.)
-
- (5) driver-side front side trim (See FRONT SIDE TRIM REMOVAL/INSTALLATION.)
-
- (6) driver-side lower panel (See DRIVER-SIDE LOWER PANEL REMOVAL/INSTALLATION.)
-
4. While pressing the bracket tabs in the direction of arrows (1) shown in the figure, pull the auto leveling control module connector in the direction of arrow (2) and pull out the auto leveling control module from the bracket.
5. Disconnect the connector and remove the auto leveling control module.
6. Install in the reverse order of removal.
7. If the auto leveling control module is replaced, perform the following procedure.
- (1) Switch the main power ON (READY off) to complete the global central configuration (GCC) for the auto leveling control module.
-
- (2) Clear the DTC. (See CLEARING DTC.)
-
- (3) Perform the headlight auto leveling system initialization. (See HEADLIGHT AUTO LEVELING SYSTEM INITIALIZATION.)
-