 |
amxuuw00002593
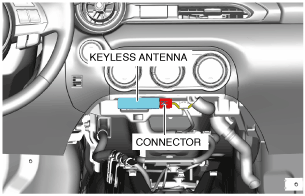
KEYLESS ANTENNA REMOVAL/INSTALLATION
id091400514900
Vehicle Interior, Front
L.H.D.
1. Disconnect the negative battery terminal. (See NEGATIVE BATTERY TERMINAL DISCONNECTION/CONNECTION.)
2. Remove the following parts:
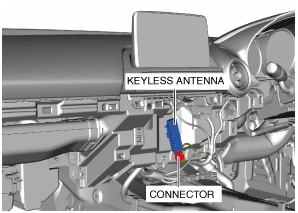
3. Disconnect the connector from the keyless antenna.
amxuuw00002593
|
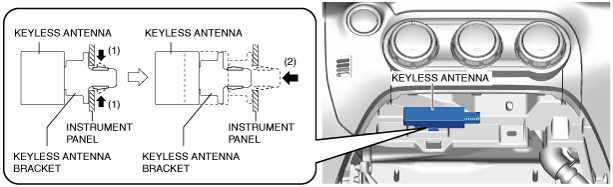
4. While pressing the keyless antenna bracket tab in the direction of arrow (1) shown in the figure, press it in the direction of arrow (2) to detach the keyless antenna bracket tab from the instrument panel.
amxuuw00002594
|
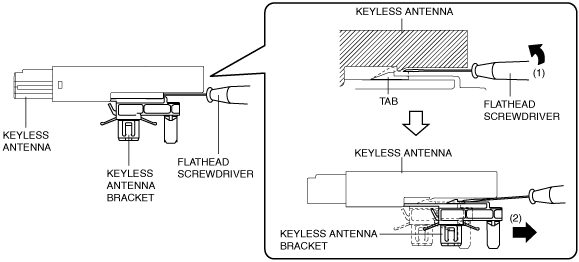
5. Insert a tape-wrapped flathead screwdriver into the position shown in the figure.
am2zzw00012256
|
6. Move the tape-wrapped flathead screwdriver in the direction of arrow (1) shown in the figure to press the keyless antenna bracket tab, and pull it in the direction of arrow (2) to detach the keyless antenna bracket from the keyless antenna.
7. Remove the keyless antenna bracket from the keyless antenna.
8. Install in the reverse order of removal.
R.H.D.
1. Disconnect the negative battery terminal. (See NEGATIVE BATTERY TERMINAL DISCONNECTION/CONNECTION.)
2. Remove the following parts:
3. Disconnect the connector from the keyless antenna.
amxzzw00003509
|
4. While pressing the keyless antenna bracket tab in the direction of arrow (1) shown in the figure, press it in the direction of arrow (2) to detach the keyless antenna bracket tab from the instrument panel.
amxzzw00003510
|
5. Insert a tape-wrapped flathead screwdriver into the position shown in the figure.
am2zzw00012256
|
6. Move the tape-wrapped flathead screwdriver in the direction of arrow (1) shown in the figure to press the keyless antenna bracket tab, and pull it in the direction of arrow (2) to detach the keyless antenna bracket from the keyless antenna.
7. Remove the keyless antenna bracket from the keyless antenna.
8. Install in the reverse order of removal.
Vehicle Interior, Center (With Advanced Keyless Entry System)
1. Disconnect the negative battery terminal. (See NEGATIVE BATTERY TERMINAL DISCONNECTION/CONNECTION.)
2. Remove the following parts:
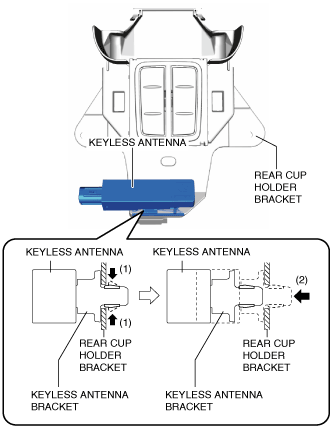
3. While pressing the keyless antenna bracket tabs in the direction of arrow (1) shown in the figure, press it in the direction of arrow (2) to detach the keyless antenna bracket tabs from the rear cup holder bracket.
amxuuw00002595
|
4. Remove the keyless antenna from the rear cup holder bracket.
5. Insert a tape-wrapped flathead screwdriver into the position shown in the figure.
am2zzw00012256
|
6. Move the tape-wrapped flathead screwdriver in the direction of arrow (1) shown in the figure to press the keyless antenna bracket tab, and pull it in the direction of arrow (2) to detach the keyless antenna bracket from the keyless antenna.
7. Remove the keyless antenna bracket from the keyless antenna.
8. Install in the reverse order of removal.
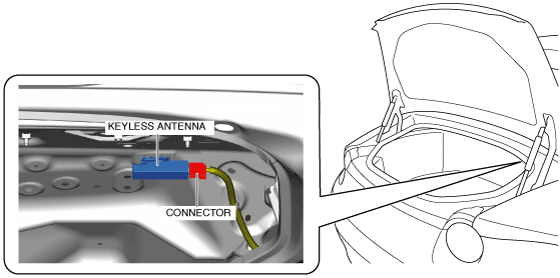
Vehicle Interior, Rear (With Advanced Keyless Entry System)
1. Open the trunk lid.
2. Disconnect the negative battery terminal. (See NEGATIVE BATTERY TERMINAL DISCONNECTION/CONNECTION.)
3. Partially peel back the partition board to the position allowing removal of the keyless antenna. (See PARTITION BOARD REMOVAL/INSTALLATION.)
4. Disconnect the connector from the keyless antenna.
amxuuw00002596
|
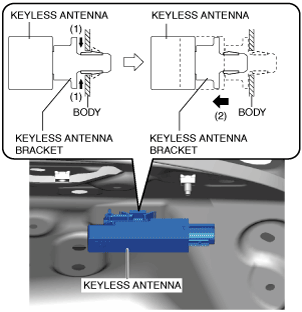
5. While pressing the keyless antenna bracket tab in the direction of arrow (1) shown in the figure, press it in the direction of arrow (2) to detach the keyless antenna bracket tab from the body.
amxuuw00002597
|
6. Insert a tape-wrapped flathead screwdriver into the position shown in the figure.
am2zzw00012256
|
7. Move the tape-wrapped flathead screwdriver in the direction of arrow (1) shown in the figure to press the keyless antenna bracket tab, and pull it in the direction of arrow (2) to detach the keyless antenna bracket from the keyless antenna.
8. Remove the keyless antenna from the keyless antenna bracket.
9. Install in the reverse order of removal.
Vehicle Exterior, Rear (With Advanced Keyless Entry System)
1. Disconnect the negative battery terminal. (See NEGATIVE BATTERY TERMINAL DISCONNECTION/CONNECTION.)
2. Remove the following parts:
3. Disconnect the connector from the keyless antenna.
amxuuw00002598
|
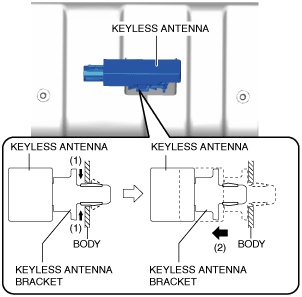
4. While pressing the keyless antenna bracket tab in the direction of arrow (1) shown in the figure, press it in the direction of arrow (2) to detach the keyless antenna bracket tab from the body.
amxuuw00002599
|
5. Remove the keyless antenna from the body.
6. Insert a tape-wrapped flathead screwdriver into the position shown in the figure.
am2zzw00012256
|
7. Move the tape-wrapped flathead screwdriver in the direction of arrow (1) shown in the figure to press the keyless antenna bracket tab, and pull it in the direction of arrow (2) to detach the keyless antenna bracket from the keyless antenna.
8. Remove the keyless antenna bracket from the keyless antenna.
9. Install in the reverse order of removal.
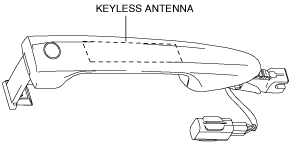
Vehicle Exterior, Driver's side/Passenger's side (With Advanced Keyless Entry System)
am3uuw00009944
|