LIFTGATE HINGE REMOVAL/INSTALLATION
id091100521300
1. Disconnect the negative battery terminal. (See NEGATIVE BATTERY TERMINAL DISCONNECTION/CONNECTION.)
2. Remove the following parts:
- (1) Sunroof seaming welt (with sunroof system) (See SUNROOF UNIT REMOVAL/INSTALLATION.)
-
- (2) A-pillar trim (See A-PILLAR TRIM REMOVAL/INSTALLATION.)
-
- (3) Sunvisor (See SUNVISOR REMOVAL/INSTALLATION.)
-
- (4) Front map light (See MAP LIGHT REMOVAL/INSTALLATION.)
-
- (5) Assist handle (See ASSIST HANDLE REMOVAL/INSTALLATION.)
-
- (6) Front scuff plate (See FRONT SCUFF PLATE REMOVAL/INSTALLATION.)
-
- (7) Front side trim (RH) (with center display) (See FRONT SIDE TRIM REMOVAL/INSTALLATION.)
-
- (8) Rear scuff plate (See REAR SCUFF PLATE REMOVAL/INSTALLATION.)
-
- (9) B-pillar lower trim (See B-PILLAR LOWER TRIM REMOVAL/INSTALLATION.)
-
- (10) Adjust anchor cover (See FRONT SEAT BELT REMOVAL/INSTALLATION.)
-
- (11) Upper anchor installation bolt on the seat belt (See FRONT SEAT BELT REMOVAL/INSTALLATION.)
-
- (12) B-pillar upper trim (See B-PILLAR UPPER TRIM REMOVAL/INSTALLATION.)
-
- (13) Rear seat cushion (See REAR SEAT CUSHION REMOVAL/INSTALLATION.)
-
- (14) Rear seat belt lower anchor installation bolt (See REAR SEAT BELT REMOVAL/INSTALLATION.)
-
- (15) Trunk board (See TRUNK BOARD REMOVAL/INSTALLATION.)
-
- (16) Trunk side pocket (See TRUNK SIDE POCKET REMOVAL/INSTALLATION.)
-
- (17) Trunk end trim (See TRUNK END TRIM REMOVAL/INSTALLATION.)
-
- (18) Trunk side upper trim (See TRUNK SIDE UPPER TRIM REMOVAL/INSTALLATION.)
-
- (19) C-pillar trim (See C-PILLAR TRIM REMOVAL/INSTALLATION.)
-
- (20) D-pillar trim (See D-PILLAR TRIM REMOVAL/INSTALLATION.)
-
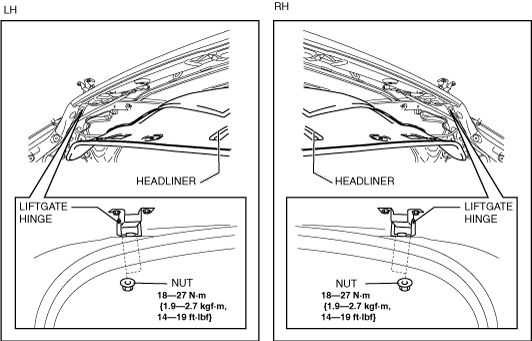
- (21) Head liner (See HEADLINER REMOVAL/INSTALLATION.)
-
3. While partially peeling back the rear part of the headliner, remove nuts.
-
Caution
-
• Peeling back the headliner without supporting it may cause the headliner to bend excessively and create a fold seam. Peel back the headliner while supporting it.
4. Remove the liftgate hinges.
5. Install in the reverse order of removal.