ANTENNA FEEDER NO.3 REMOVAL/INSTALLATION
id092000812900
-
Note
-
• The antenna feeder No.3 can be removed without having to remove the headliner from the vehicle.
1. Disconnect the negative battery terminal. (See NEGATIVE BATTERY TERMINAL DISCONNECTION/CONNECTION..)
2. Remove the following parts:
- (1) Sunroof seaming welt (with sunroof system) (See SUNROOF UNIT REMOVAL/INSTALLATION.)
-
- (2) A-pillar trim (See A-PILLAR TRIM REMOVAL/INSTALLATION.)
-
- (3) Sunvisor (See SUNVISOR REMOVAL/INSTALLATION.)
-
- (4) Front map light (See MAP LIGHT REMOVAL/INSTALLATION.)
-
- (5) Assist handle (See ASSIST HANDLE REMOVAL/INSTALLATION.)
-
- (6) Front scuff plate (See FRONT SCUFF PLATE REMOVAL/INSTALLATION.)
-
- (7) Front side trim (RH) (with center display) (See FRONT SIDE TRIM REMOVAL/INSTALLATION.)
-
- (8) Rear scuff plate (See REAR SCUFF PLATE REMOVAL/INSTALLATION.)
-
- (9) B-pillar lower trim (See B-PILLAR LOWER TRIM REMOVAL/INSTALLATION.)
-
- (10) Adjust anchor cover (See FRONT SEAT BELT REMOVAL/INSTALLATION.)
-
- (11) Upper anchor installation bolt on the seat belt (See FRONT SEAT BELT REMOVAL/INSTALLATION.)
-
- (12) B-pillar upper trim (See B-PILLAR UPPER TRIM REMOVAL/INSTALLATION.)
-
- (13) Rear seat cushion (See REAR SEAT CUSHION REMOVAL/INSTALLATION.)
-
- (14) Rear seat belt lower anchor installation bolt (See REAR SEAT BELT REMOVAL/INSTALLATION.)
-
- (15) Trunk board (See TRUNK BOARD REMOVAL/INSTALLATION.)
-
- (16) Trunk side pocket (See TRUNK SIDE POCKET REMOVAL/INSTALLATION.)
-
- (17) Trunk end trim (See TRUNK END TRIM REMOVAL/INSTALLATION.)
-
- (18) Trunk side upper trim (See TRUNK SIDE UPPER TRIM REMOVAL/INSTALLATION.)
-
- (19) C-pillar trim (See C-PILLAR TRIM REMOVAL/INSTALLATION.)
-
- (20) D-pillar trim (See D-PILLAR TRIM REMOVAL/INSTALLATION.)
-
- (21) Headliner (See HEADLINER REMOVAL/INSTALLATION.)
-
3. Remove the rear passenger's assist handle. (See ASSIST HANDLE REMOVAL/INSTALLATION.)
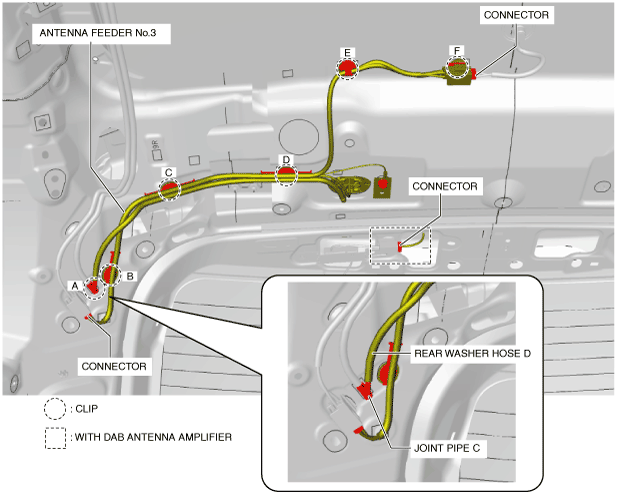
4. Disconnect the connectors.
5. Remove clips A, B, C, D, E, and F in the position shown in the figure.
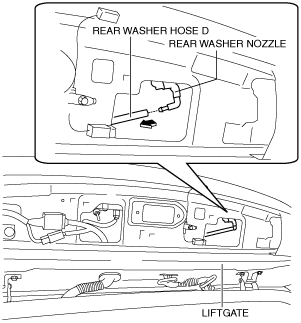
6. Disconnect the rear washer hose D from the joint pipe C.
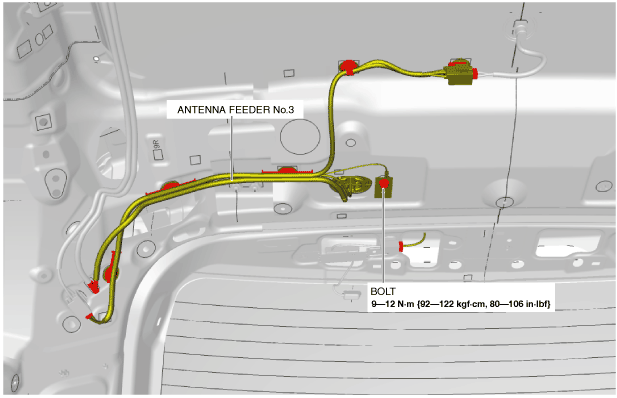
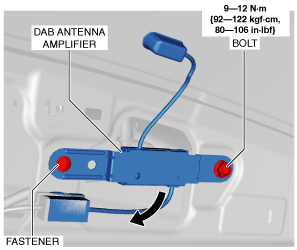
7. Remove the bolt. (with DAB antenna amplifier)
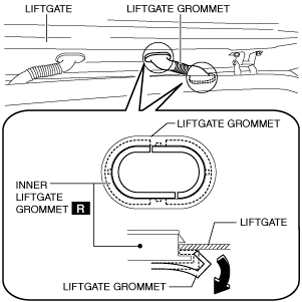
8. Partially peel the liftgate grommet in the direction of arrow shown in the figure, and remove the liftgate grommet from the inner liftgate grommet.
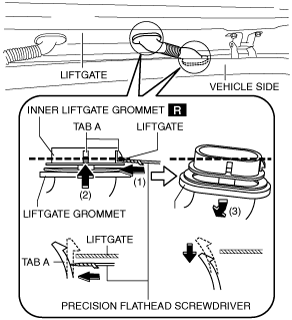
9. Using a tape-wrapped flathead screwdriver, press the inner liftgate grommet tabs A in the directions of arrows (1) and (2) shown in the figure and remove the inner liftgate grommet from the liftgate in the direction of arrow (3).
10. Remove the bolt. (with DAB antenna amplifier)
11. Remove the fastener (with DAB antenna amplifier).
12. Set the DAB antenna amplifier aside in the direction of the arrow shown in the figure. (with DAB antenna amplifier).
13. Disconnect the rear washer hose D from the rear washer nozzle and remove it.
14. Remove the antenna feeder No.3.
15. Install in the reverse order of removal.