CURTAIN AIR BAG MODULE REMOVAL/INSTALLATION [TWO-STEP DEPLOYMENT CONTROL SYSTEM (E)]
id0810b9702600
Replacement parts
|
Clip
Quantity: 3
Location of use: Curtain air bag module
|
Double-sided adhesive tape
Quantity: 1
Location of use: Curtain air bag module
|
-
Warning
-
<<High voltage>>
• Vehicles damaged in an accident could have electrical leakage due to internal damage of the high voltage battery. If servicing is carried out under electrical leakage conditions, it could cause electrical shock and result in serious injury or, in the worst case, death.
• Refer to [Handling high voltage battery on damaged vehicle] in [DAMAGED VEHICLE HANDLING] in the general information and determine if an internal inspection of the high voltage battery is necessary.(See
DAMAGED VEHICLE HANDLING [(E)].) Perform servicing only if an internal inspection of the high voltage battery is unnecessary. If it is determined that an internal inspection of the high voltage battery is necessary, contact the technical assistance for your market without performing servicing.
-
Warning
-
-
Note
-
• The SRS air bag system can be identified by whether or not the seat track position sensor is present.
-
― Standard deployment control system: Without seat track position sensor
― Two-step deployment control system: With seat track position sensor
1. Switch the main power OFF.
2. Disconnect the negative lead-acid battery terminal and wait for 1 min or more. (See NEGATIVE LEAD-ACID BATTERY TERMINAL DISCONNECTION/CONNECTION.)
3. Remove the following parts:
- (1) Front map light(See FRONT MAP LIGHT REMOVAL/INSTALLATION [(E)].)
-
- (2) Sensor cover (See SENSOR COVER REMOVAL/INSTALLATION.)
-
- (3) Sunvisor (See SUNVISOR REMOVAL/INSTALLATION.)
-
- (4) Assist handle (See ASSIST HANDLE REMOVAL/INSTALLATION.)
-
- (5) Front pillar trim (See FRONT PILLAR TRIM REMOVAL/INSTALLATION.)
-
- (6) Roof side trim (See ROOF SIDE TRIM REMOVAL/INSTALLATION.)
-
- (7) Rear package tray (See REAR PACKAGE TRAY REMOVAL/INSTALLATION.)
-
- (8) Trunk side upper trim (See TRUNK SIDE UPPER TRIM REMOVAL/INSTALLATION.)
-
- (9) Rear pillar trim (See REAR PILLAR TRIM REMOVAL/INSTALLATION.)
-
- (10) Headliner (See HEADLINER REMOVAL/INSTALLATION.)
-
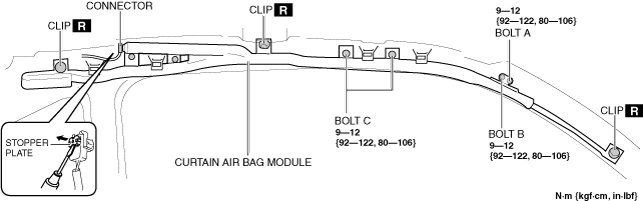
4. Using a flathead screwdriver, pry out the connector stopper plate.
5. Disconnect the connector.
6. Remove bolt A. (See Bolt Installation Note.)
7. Remove bolt B. (See Bolt Installation Note.)
8. Remove bolt C.
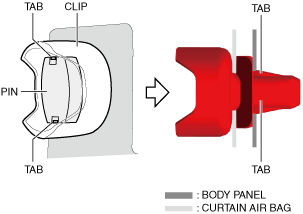
9. Detach the tabs of the pin from the clip, and remove the pin.
10. Insert a flathead screwdriver into the clip and detach the tabs from the body panel.
11. Remove the clips.
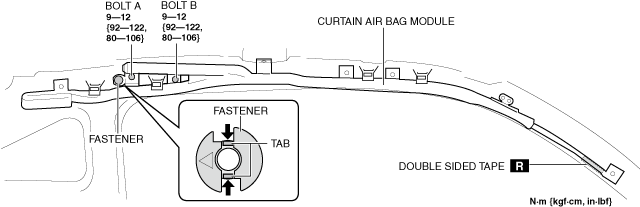
12. Remove the double-sided adhesive tape.
13. Remove bolt A.
14. Remove bolt B.
15. Press the tabs in the direction of the arrow shown in the figure and remove the fastener.
16. Remove the curtain air bag module.
17. Install in the reverse order of removal.
18. Switch the main power ON (READY off or on).
19. Verify that the air bag/seat belt pre-tensioner system warning light turns on for approx. 6 s and turns off.
-
• If the air bag/pre-tensioner warning light does not work properly, verify the DTCs. (See
DTC INSPECTION.)
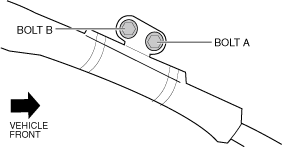
Bolt Installation Note
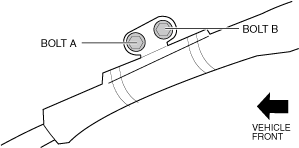
Right side of vehicle
1. Temporarily tighten bolt B.
2. Tighten bolt A.
3. Tighten bolt B.
Left side of vehicle
1. Temporarily tighten bolt A.
2. Tighten bolt B.
3. Tighten bolt A.