AIR BAG MID-WIRING HARNESS INSTALLATION
id081000804500
-
Warning
-
-
Note
-
• When replacing only the air bag wiring harness inside the dashboard without replacing the passenger-side air bag module, do not replace the existing wiring harness, and install a new air bag mid-wiring harness according to the procedure, “Dashboard Not Removed”. (See
Dashboard Not Removed.)
• Do not reuse the existing wiring harness of a passenger-side air bag module which has deployed. Install a new air bag mid-wiring harness according to the procedure, “Dashboard Removed”. (See
Dashboard Removed.)
Dashboard Not Removed
-
Note
-
• When installing the mid-wiring harness, install it along the vehicle wiring harness.
1. Turn the ignition switch to the LOCK position.
2. Disconnect the negative battery cable and wait for 1 min or more.
3. Remove the following parts:
- (1) Glove compartment (See GLOVE COMPARTMENT REMOVAL/INSTALLATION.)
- (2) Glove compartment cover (See GLOVE COMPARTMENT COVER REMOVAL/INSTALLATION.)
- (3) Dashboard under cover (See DASHBOARD UNDER COVER REMOVAL/INSTALLATION.)
- (4) Side wall (See SIDE WALL REMOVAL/INSTALLATION.)
- (5) Shift lever knob (MTX)
- (6) Front console component (See FRONT CONSOLE COMPONENT REMOVAL/INSTALLATION.)
- (7) Front scuff plate (See FRONT SCUFF PLATE REMOVAL/INSTALLATION.)
- (8) Front side trim (See FRONT SIDE TRIM REMOVAL/INSTALLATION.)
- (9) Bonnet release lever (See BONNET LATCH AND RELEASE LEVER REMOVAL/INSTALLATION.)
- (10) Driver-side lower panel (See LOWER PANEL REMOVAL/INSTALLATION.)
- (11) Driver-side air bag module (See DRIVER-SIDE AIR BAG MODULE REMOVAL/INSTALLATION.)
- (12) Steering wheel (See STEERING WHEEL AND COLUMN REMOVAL/INSTALLATION [L.H.D.].) (See STEERING WHEEL AND COLUMN REMOVAL/INSTALLATION [R.H.D.].)
- (13) Column cover (See COLUMN COVER REMOVAL/INSTALLATION.)
- (14) Shift lever (MTX) (See MANUAL TRANSAXLE SHIFT MECHANISM REMOVAL/INSTALLATION [F35M-R].) (See MANUAL TRANSAXLE SHIFT MECHANISM REMOVAL/INSTALLATION [B65M-R].)
- (15) Selector lever (ATX) (See AUTOMATIC TRANSAXLE SHIFT MECHANISM REMOVAL/INSTALLATION.)
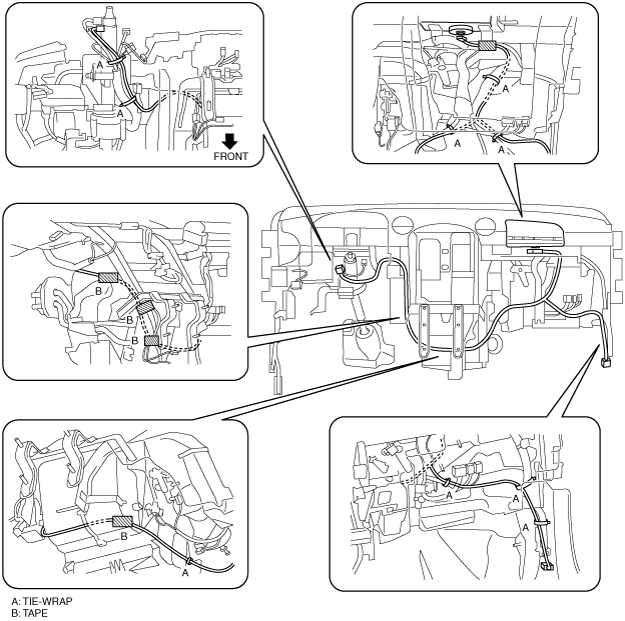
4. Using tie-wraps or tape, install the mid-wiring harness as shown in the figure.
L.H.D.
R.H.D.
Dashboard Removed
-
Note
-
• When installing the mid-wiring harness, install it along the vehicle wiring harness.
1. Turn the ignition switch to the LOCK position.
2. Disconnect the negative battery cable and wait for 1 min or more.
3. Remove the following parts:
- (1) Glove compartment (See GLOVE COMPARTMENT REMOVAL/INSTALLATION.)
- (2) Glove compartment cover (See GLOVE COMPARTMENT COVER REMOVAL/INSTALLATION.)
- (3) Dashboard under cover (See DASHBOARD UNDER COVER REMOVAL/INSTALLATION.)
- (4) Heat duct (passenger side) (See HEAT DUCT COMPONENT REMOVAL/INSTALLATION.)
- (5) Shift lever knob (MTX)
- (6) Side wall (See SIDE WALL REMOVAL/INSTALLATION.)
- (7) Front console component (See FRONT CONSOLE COMPONENT REMOVAL/INSTALLATION.)
- (8) Front scuff plate (See FRONT SCUFF PLATE REMOVAL/INSTALLATION.)
- (9) Front side trim (See FRONT SIDE TRIM REMOVAL/INSTALLATION.)
- (10) Bonnet release lever (See BONNET LATCH AND RELEASE LEVER REMOVAL/INSTALLATION.)
- (11) Driver-side lower panel (See LOWER PANEL REMOVAL/INSTALLATION.)
- (12) Driver-side air bag module (See DRIVER-SIDE AIR BAG MODULE REMOVAL/INSTALLATION.)
- (13) Steering wheel (See STEERING WHEEL AND COLUMN REMOVAL/INSTALLATION [L.H.D.].) (See STEERING WHEEL AND COLUMN REMOVAL/INSTALLATION [R.H.D.].)
- (14) Column cover (See COLUMN COVER REMOVAL/INSTALLATION.)
- (15) Meter hood (See METER HOOD REMOVAL/INSTALLATION.)
- (16) Instrument cluster (See INSTRUMENT CLUSTER REMOVAL/INSTALLATION.)
- (17) Combination switch (See COMBINATION SWITCH REMOVAL/INSTALLATION.))
- (18) Center panel unit (vehicles with audio unit) (See CENTER PANEL UNIT REMOVAL/INSTALLATION.)
- (19) Center panel (vehicles without audio unit) (See CENTER PANEL REMOVAL/INSTALLATION.)
- (20) Climate control unit (See CLIMATE CONTROL UNIT REMOVAL/INSTALLATION [FULL-AUTO AIR CONDITIONER].) (See CLIMATE CONTROL UNIT REMOVAL/INSTALLATION [MANUAL AIR CONDITIONER].)
- (21) Shift lever (MTX) (See MANUAL TRANSAXLE SHIFT MECHANISM REMOVAL/INSTALLATION [F35M-R].) (See MANUAL TRANSAXLE SHIFT MECHANISM REMOVAL/INSTALLATION [B65M-R].)
- (22) Selector lever (ATX) (See AUTOMATIC TRANSAXLE SHIFT MECHANISM REMOVAL/INSTALLATION.)
- (23) Interlock cable (See AUTOMATIC TRANSAXLE SHIFT MECHANISM REMOVAL/INSTALLATION.)
- (24) Passenger-side lower panel (See LOWER PANEL REMOVAL/INSTALLATION.)
- (25) Side panel (See SIDE PANEL REMOVAL/INSTALLATION.)
- (26) A-pillar trim (See A-PILLAR TRIM REMOVAL/INSTALLATION.)
- (27) Windshield wiper arm and blade (SeeWINDSHIELD WIPER ARM AND BLADE REMOVAL/INSTALLATION.)
- (28) Cowl grille (See COWL GRILLE REMOVAL/INSTALLATION.)
- (29) Windshield wiper motor (L.H.D.) (See WINDSHIELD WIPER MOTOR REMOVAL/INSTALLATION.)
- (30) Steering shaft cover (See STEERING WHEEL AND COLUMN REMOVAL/INSTALLATION [L.H.D.].) (See STEERING WHEEL AND COLUMN REMOVAL/INSTALLATION [R.H.D.].)
- (31) Steering shaft (See STEERING WHEEL AND COLUMN REMOVAL/INSTALLATION [L.H.D.].) (See STEERING WHEEL AND COLUMN REMOVAL/INSTALLATION [R.H.D.].)
- (32) Dashboard (See DASHBOARD REMOVAL/INSTALLATION.)
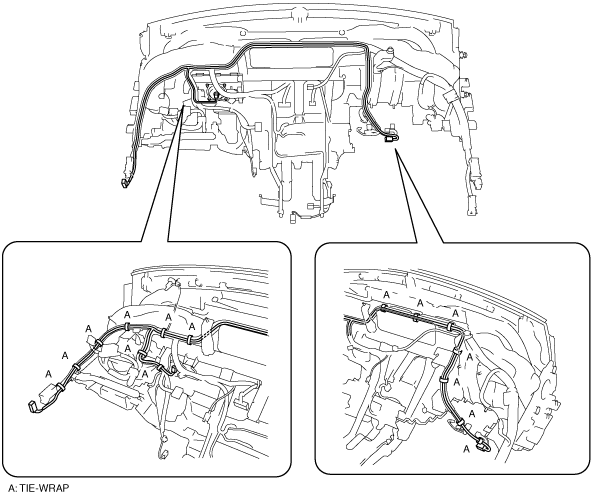
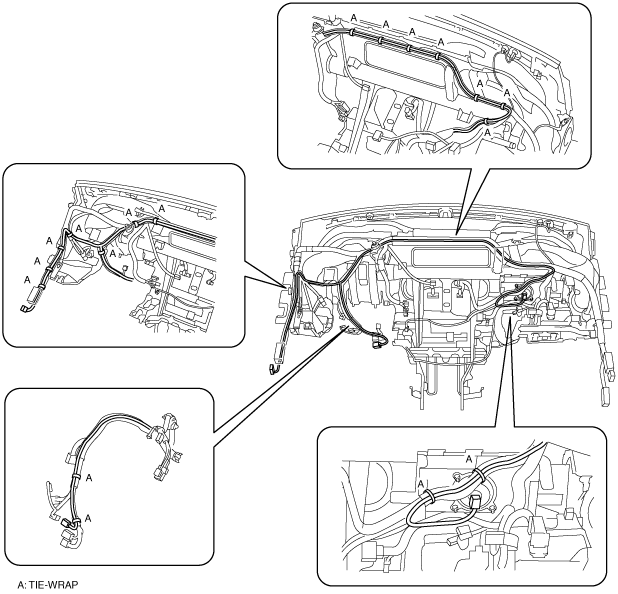
4. Using tie-wraps or tape, install the mid-wiring harness as shown in the figure.
L.H.D.
R.H.D.