REAR SEAT BACK STRIKER REMOVAL/INSTALLATION
id091300301800
1. Switch the main power OFF.
2. Disconnect the negative lead-acid battery terminal. (See NEGATIVE LEAD-ACID BATTERY TERMINAL DISCONNECTION/CONNECTION.)
3. Operate the recliner knob to fold the rear seat back.
4. Remove the following parts.
- (1) Rear package tray (See REAR PACKAGE TRAY REMOVAL/INSTALLATION.)
-
- (2) Trunk covering (See TRUNK COVERING REMOVAL/INSTALLATION.)
-
- (3) Rear trunk board (See TRUNK BOARD REMOVAL/INSTALLATION.)
-
- (4) Front trunk board (See TRUNK BOARD REMOVAL/INSTALLATION.)
-
- (5) Trunk end trim (See TRUNK END TRIM REMOVAL/INSTALLATION.)
-
- (6) Scuff plate (See SCUFF PLATE REMOVAL/INSTALLATION.)
-
- (7) Trunk side upper trim (See TRUNK SIDE UPPER TRIM REMOVAL/INSTALLATION.)
-
- (8) Rear pillar trim (See REAR PILLAR TRIM REMOVAL/INSTALLATION.)
-
- (9) Rear seat cushion (See REAR SEAT CUSHION REMOVAL/INSTALLATION.)
-
5. When removing the rear seat back (LH), perform the following procedure.
- (1) Remove the rear buckle (LH). (See REAR BUCKLE REMOVAL/INSTALLATION.)
-
- (2) Remove the rear center seat belt anchor. (See REAR CENTER SEAT BELT REMOVAL/INSTALLATION.)
-
6. Remove the following parts.
- (1) Rear seat back (See REAR SEAT BACK REMOVAL/INSTALLATION.)
-
- (2) Tire house trim(See TIRE HOUSE TRIM REMOVAL/INSTALLATION [(E)].)
-
- (3) Trunk side trim (See TRUNK SIDE TRIM REMOVAL/INSTALLATION.)
-
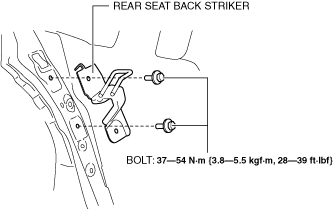
7. Remove the bolts and the rear seat back striker.
8. Install in the reverse order of removal.