REAR WASHER HOSE REMOVAL/INSTALLATION


id091900801600

Replacement Part

Inner liftgate gromet
 
Quantity: 2
 
Location of use: Liftgate
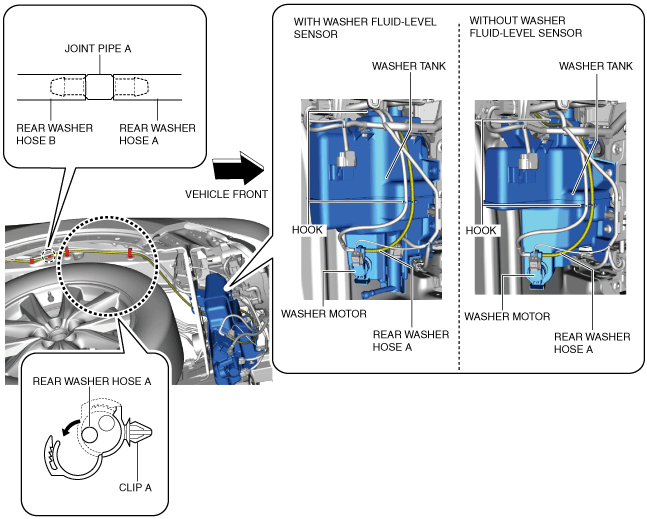

Rear Washer Hose A

1.  Disconnect the negative battery terminal. (See NEGATIVE BATTERY TERMINAL DISCONNECTION/CONNECTION.)

2.  Remove the front over fender (RH). (See FRONT OVER FENDER REMOVAL/INSTALLATION.)

3.  Remove the mudguard (RH). (See MUDGUARD REMOVAL/INSTALLATION.)

4.  Disconnect the rear washer hose A from the washer motor.

ac5uuw00007163

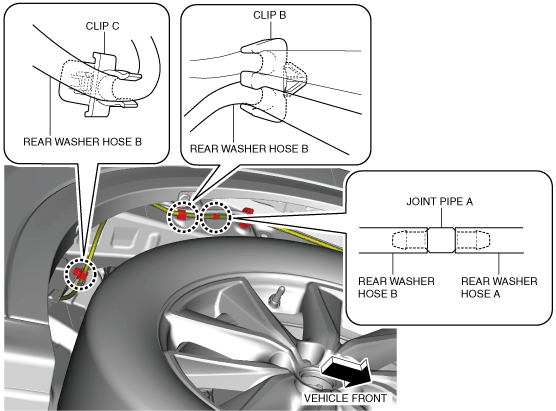
5.  Remove the rear washer hose A from the washer tank hook.

6.  Remove the rear washer hose A from clips A.

7.  Disconnect the rear washer hose A from the joint pipe A and remove it.

8.  Install in the reverse order of removal.


Rear Washer Hose B

1.  Disconnect the negative battery terminal. (See NEGATIVE BATTERY TERMINAL DISCONNECTION/CONNECTION.)

2.  Remove the front over fender (RH). (See FRONT OVER FENDER REMOVAL/INSTALLATION.)

3.  Remove the mudguard (RH). (See MUDGUARD REMOVAL/INSTALLATION.)

4.  Disconnect the rear washer hose B from the joint pipe A.

ac5wzw00011898

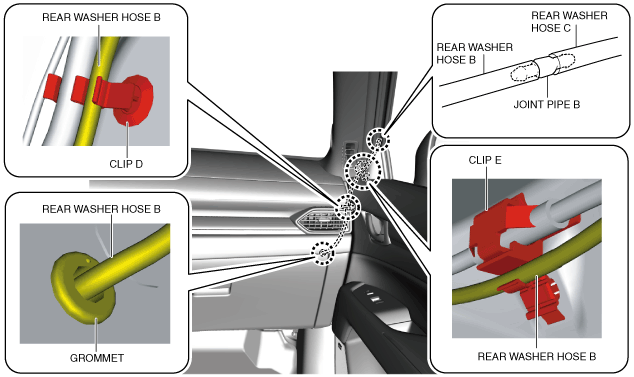
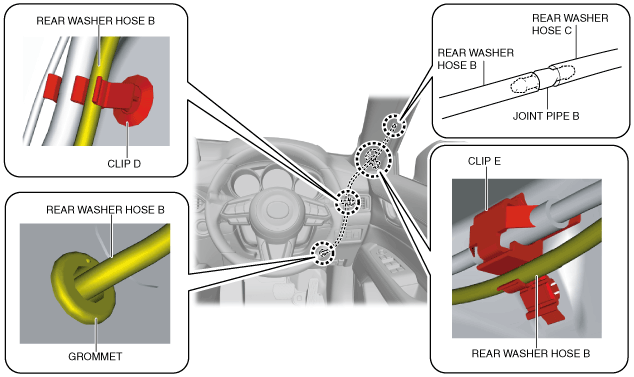
5.  Remove the rear washer hose B from clips B and C.

6.  Remove the following parts:

L.H.D.
1.  Passenger-side front scuff plate (See FRONT SCUFF PLATE REMOVAL/INSTALLATION.)
2.  Passenger-side front side trim (See FRONT SIDE TRIM REMOVAL/INSTALLATION.)
3.  Glove compartment (See GLOVE COMPARTMENT REMOVAL/INSTALLATION.)
4.  Dashboard under cover (See DASHBOARD UNDER COVER REMOVAL/INSTALLATION.)
5.  Tuner and amp unit (TAU) (See TUNER AND AMP UNIT (TAU) REMOVAL/INSTALLATION.)
6.  Passenger-side A-pillar trim (See A-PILLAR TRIM REMOVAL/INSTALLATION.)
R.H.D.
1.  Driver-side front scuff plate (See FRONT SCUFF PLATE REMOVAL/INSTALLATION.)
2.  Driver-side front side trim (See FRONT SIDE TRIM REMOVAL/INSTALLATION.)
3.  Lower decoration panel (See DECORATION PANEL REMOVAL/INSTALLATION.)
5.  Fuel-filler lid opener lever (See FUEL-FILLER LID OPENER AND LEVER REMOVAL/INSTALLATION.)
6.  Driver-side lower panel (See LOWER PANEL REMOVAL/INSTALLATION.)
7.  Tuner and amp unit (TAU) (See TUNER AND AMP UNIT (TAU) REMOVAL/INSTALLATION.)
8.  Driver-side A-pillar trim (See A-PILLAR TRIM REMOVAL/INSTALLATION.)

7.  Remove the grommet from the body.

L.H.D.

ac5wzw00011899

R.H.D.

ac5wzw00011900

8.  Remove the rear washer hose B from clips D and E.

9.  Disconnect the rear washer hose B from the joint pipe B.

10.  Install in the reverse order of removal.


Rear Washer Hose C

1.  Disconnect the negative battery terminal. (See NEGATIVE BATTERY TERMINAL DISCONNECTION/CONNECTION.)

2.  Remove the following parts:

(1)  Sunroof seaming welt (With sunroof system) (See SUNROOF UNIT REMOVAL/INSTALLATION.)
(2)  A-pillar trim (See A-PILLAR TRIM REMOVAL/INSTALLATION.)
(3)  Front map light (See FRONT MAP LIGHT REMOVAL/INSTALLATION.)
(4)  Sunvisor (See SUNVISOR REMOVAL/INSTALLATION.)
(5)  Lower decoration panel (See DECORATION PANEL REMOVAL/INSTALLATION.)
(6)  Front scuff plate (See FRONT SCUFF PLATE REMOVAL/INSTALLATION.)
(7)  Passenger-side front side trim (See FRONT SIDE TRIM REMOVAL/INSTALLATION.)
(8)  Glove compartment (See GLOVE COMPARTMENT REMOVAL/INSTALLATION.)
(9)  Dashboard under cover (See DASHBOARD UNDER COVER REMOVAL/INSTALLATION.)
(10)  Passenger-side lower panel (See LOWER PANEL REMOVAL/INSTALLATION.)
(11)  Assist handle (See ASSIST HANDLE REMOVAL/INSTALLATION.)
(12)  Rear scuff plate (See REAR SCUFF PLATE REMOVAL/INSTALLATION.)
(13)  B-pillar lower trim (See B-PILLAR LOWER TRIM REMOVAL/INSTALLATION.)
(14)  Adjust anchor cover on the front seat belt (See FRONT SEAT BELT REMOVAL/INSTALLATION.)
(15)  Upper anchor installation bolt on the front seat belt (See FRONT SEAT BELT REMOVAL/INSTALLATION.)
(16)  B-pillar upper trim (See B-PILLAR UPPER TRIM REMOVAL/INSTALLATION.)
(17)  Rear seat cushion (See REAR SEAT CUSHION REMOVAL/INSTALLATION.)
(18)  Trunk board (See TRUNK BOARD REMOVAL/INSTALLATION.)
(19)  Bass box (with Bose®) (See BASS-BOX REMOVAL/INSTALLATION.)
(20)  Sub-trunk (See SUB-TRUNK REMOVAL/INSTALLATION.)
(21)  Trunk end trim (See TRUNK END TRIM REMOVAL/INSTALLATION.)
(22)  Trunk side trim (See TRUNK SIDE TRIM REMOVAL/INSTALLATION.)
(23)  C-pillar trim (See C-PILLAR TRIM REMOVAL/INSTALLATION.)
(24)  Headliner (See HEADLINER REMOVAL/INSTALLATION.)

3.  Remove the tape.

Without sunroof

ac5uuw00007166

With sunroof

ac5uuw00007167

4.  Remove the rear washer hose C. (See Rear washer hose C installation note.)

5.  Install in the reverse order of removal.


Rear washer hose C installation note

1.  When installing rear washer hose C to the headliner, install it aligning to the position shown in the figure.

ac5uuw00007168


Rear Washer Hose D

1.  Disconnect the negative battery terminal. (See NEGATIVE BATTERY TERMINAL DISCONNECTION/CONNECTION.)

2.  Remove the following parts:

(1)  Sunroof seaming welt (With sunroof system) (See SUNROOF UNIT REMOVAL/INSTALLATION.)
(2)  A-pillar trim (See A-PILLAR TRIM REMOVAL/INSTALLATION.)
(3)  Front map light (See FRONT MAP LIGHT REMOVAL/INSTALLATION.)
(4)  Sunvisor (See SUNVISOR REMOVAL/INSTALLATION.)
(5)  Lower decoration panel (See DECORATION PANEL REMOVAL/INSTALLATION.)
(6)  Front scuff plate (See FRONT SCUFF PLATE REMOVAL/INSTALLATION.)
(7)  Passenger-side front side trim (See FRONT SIDE TRIM REMOVAL/INSTALLATION.)
(8)  Glove compartment (See GLOVE COMPARTMENT REMOVAL/INSTALLATION.)
(9)  Dashboard under cover (See DASHBOARD UNDER COVER REMOVAL/INSTALLATION.)
(10)  Passenger-side lower panel (See LOWER PANEL REMOVAL/INSTALLATION.)
(11)  Assist handle (See ASSIST HANDLE REMOVAL/INSTALLATION.)
(12)  Rear scuff plate (See REAR SCUFF PLATE REMOVAL/INSTALLATION.)
(13)  B-pillar lower trim (See B-PILLAR LOWER TRIM REMOVAL/INSTALLATION.)
(14)  Adjust anchor cover on the front seat belt (See FRONT SEAT BELT REMOVAL/INSTALLATION.)
(15)  Upper anchor installation bolt on the front seat belt (See FRONT SEAT BELT REMOVAL/INSTALLATION.)
(16)  B-pillar upper trim (See B-PILLAR UPPER TRIM REMOVAL/INSTALLATION.)
(17)  Rear seat cushion (See REAR SEAT CUSHION REMOVAL/INSTALLATION.)
(18)  Trunk board (See TRUNK BOARD REMOVAL/INSTALLATION.)
(19)  Bass box (with Bose®) (See BASS-BOX REMOVAL/INSTALLATION.)
(20)  Sub-trunk (See SUB-TRUNK REMOVAL/INSTALLATION.)
(21)  Trunk end trim (See TRUNK END TRIM REMOVAL/INSTALLATION.)
(22)  Trunk side trim (See TRUNK SIDE TRIM REMOVAL/INSTALLATION.)
(23)  C-pillar trim (See C-PILLAR TRIM REMOVAL/INSTALLATION.)
(24)  Headliner (See HEADLINER REMOVAL/INSTALLATION.)

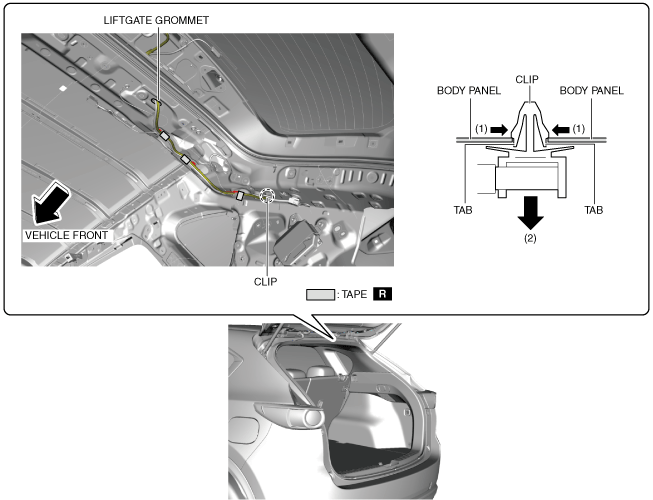
3.  While pressing the clip tabs in the direction of arrows (1) shown in the figure, pull the clip in the direction of arrow (2) to detach the clip tabs from the body panel.

ac5wzw00011901

4.  Remove the tape.

5.  Remove the liftgate upper trim. (See LIFTGATE UPPER TRIM REMOVAL/INSTALLATION.)

6.  Partially peel the liftgate grommet in the direction of arrows shown in the figure, and remove the liftgate grommet from the inner liftgate grommet.

ac9uuw00007295

7.  While pressing the tab of the inner liftgate grommet in the direction of arrow (1) shown in the figure, pull the inner liftgate grommet in the direction of arrow (2) and detach the tab of the inner liftgate grommet from the liftgate or body.

ac9uuw00007296

8.  Detach all the tabs of the inner liftgate grommet from the liftgate and remove the inner liftgate grommet.

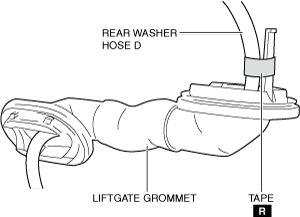
9.  Remove the tape. (See Rear washer hose D installation note.)

ac9uuw00008473

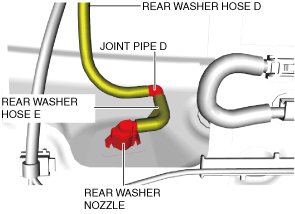
10.  Disconnect rear washer hose D from the joint pipe D.

ac5uuw00007170

11.  Remove rear washer hose D.

12.  Install in the reverse order of removal.


Rear washer hose D installation note

1.  When installing rear washer hose D to the liftgate grommet, install it aligning to the position shown in the figure.

ac5uuw00007171