ACTIVE DRIVING DISPLAY REMOVAL/INSTALLATION [(E)]
id0922001037x2
-
Warning
-
-
Caution
-
• When replacing the active driving display, perform the configuration to assure that the system operates correctly.
1. To replace the active driving display, perform the following procedure.
- (1) Connect the M-MDS to the DLC-2.
-
- (2) Switch the ignition ON (engine off).
-
- (3) Activate the M-MDS and perform the following procedure.
-
- 1) Press [Start] to start the vehicle identification.
-
- 2) Press the [Toolbox] tab.
-
- 3) Press the [Work Support] icon.
-
- 4) Press [Configuration].
-
- 5) Press [Run] to perform the configuration.
-
- 6) Press [ADD].
-
- 7) When [Install the new ECU] is displayed, move to the active driving display replacement procedure.
-
2. Disconnect the negative battery terminal and wait for 1 min or more. (See NEGATIVE BATTERY TERMINAL DISCONNECTION/CONNECTION [(E)].)
3. Remove the following parts:
- (1) A-pillar trim (See A-PILLAR TRIM REMOVAL/INSTALLATION.)
-
- (2) Front scuff plate (See FRONT SCUFF PLATE REMOVAL/INSTALLATION.)
-
- (3) Front side trim (See FRONT SIDE TRIM REMOVAL/INSTALLATION.)
-
- (4) Passenger-side decoration panel (See DECORATION PANEL REMOVAL/INSTALLATION.)
-
- (5) Glove compartment (See GLOVE COMPARTMENT REMOVAL/INSTALLATION.)
-
- (6) Dashboard under cover (See DASHBOARD UNDER COVER REMOVAL/INSTALLATION.)
-
- (7) Passenger-side lower panel (See LOWER PANEL REMOVAL/INSTALLATION [(E)].)
-
- (8) Driver-side decoration panel (See DECORATION PANEL REMOVAL/INSTALLATION.)
-
- (9) Hood release lever (See HOOD RELEASE LEVER AND RELEASE CABLE REMOVAL/INSTALLATION [(E)].)
-
- (10) Shift lever knob (MTX) (See SHIFT LEVER REMOVAL/INSTALLATION [C66M-R].) (See SHIFT LEVER REMOVAL/INSTALLATION [F66M-R].)
-
- (11) Selector lever knob (ATX) (See SELECTOR LEVER COMPONENT REMOVAL/INSTALLATION.)
-
- (12) Shift panel (See SHIFT PANEL REMOVAL/INSTALLATION.)
-
- (13) Front console box (See FRONT CONSOLE BOX REMOVAL/INSTALLATION.)
-
- (14) Cup holder (See CUP HOLDER REMOVAL/INSTALLATION.)
-
- (15) Side wall (See SIDE WALL REMOVAL/INSTALLATION.)
-
- (16) Rear console (See REAR CONSOLE REMOVAL/INSTALLATION [(E)].)
-
- (17) Center lower panel (See LOWER PANEL REMOVAL/INSTALLATION [(E)].)
-
- (18) Driver-side lower panel (See LOWER PANEL REMOVAL/INSTALLATION [(E)].)
-
- (19) Driver-side knee air bag module (See KNEE AIR BAG MODULE REMOVAL/INSTALLATION [TWO-STEP DEPLOYMENT CONTROL SYSTEM].) (See KNEE AIR BAG MODULE REMOVAL/INSTALLATION [STANDARD DEPLOYMENT CONTROL SYSTEM].)
-
- (20) Driver-side air bag module (See DRIVER-SIDE AIR BAG MODULE REMOVAL [TWO-STEP DEPLOYMENT CONTROL SYSTEM].) (See DRIVER-SIDE AIR BAG MODULE INSTALLATION [TWO-STEP DEPLOYMENT CONTROL SYSTEM].) (See DRIVER-SIDE AIR BAG MODULE REMOVAL [STANDARD DEPLOYMENT CONTROL SYSTEM].) (See DRIVER-SIDE AIR BAG MODULE INSTALLATION [STANDARD DEPLOYMENT CONTROL SYSTEM].)
-
- (21) Steering wheel (See STEERING WHEEL AND COLUMN REMOVAL/INSTALLATION [(E)].)
-
- (22) Upper column cover (See COLUMN COVER REMOVAL/INSTALLATION.)
-
- (23) Lower column cover (See COLUMN COVER REMOVAL/INSTALLATION.)
-
- (24) Clock spring (See CLOCK SPRING REMOVAL/INSTALLATION [STANDARD DEPLOYMENT CONTROL SYSTEM].) (See CLOCK SPRING REMOVAL/INSTALLATION [TWO-STEP DEPLOYMENT CONTROL SYSTEM].)
-
- (25) Light switch (See LIGHT SWITCH REMOVAL/INSTALLATION [(E)].)
-
- (26) Wiper and washer switch (See WIPER AND WASHER SWITCH REMOVAL/INSTALLATION [(E)].)
-
- (27) Joint cover (See STEERING WHEEL AND COLUMN REMOVAL/INSTALLATION [(E)].)
-
- (28) Steering shaft (See STEERING WHEEL AND COLUMN REMOVAL/INSTALLATION [(E)].)
-
- (29) Instrument cluster (See INSTRUMENT CLUSTER REMOVAL/INSTALLATION.)
-
- (30) Center speaker grille (See SPEAKER GRILLE REMOVAL/INSTALLATION.)
-
- (31) Center display component (See CENTER DISPLAY REMOVAL/INSTALLATION.)
-
- (32) Connectivity master unit (CMU) (See CONNECTIVITY MASTER UNIT (CMU) REMOVAL/INSTALLATION.)
-
- (33) Audio panel (with audio panel) (See AUDIO PANEL REMOVAL/INSTALLATION [(E)].)
-
- (34) CD player (with CD player) (See CD PLAYER REMOVAL/INSTALLATION.)
-
- (35) DVD/CD player (with DVD/CD player) (See DVD/CD PLAYER REMOVAL/INSTALLATION.)
-
- (36) Climate control unit (See CLIMATE CONTROL UNIT REMOVAL/INSTALLATION [FULL-AUTO AIR CONDITIONER (E)].) (See CLIMATE CONTROL UNIT REMOVAL/INSTALLATION [MANUAL AIR CONDITIONER (E)].)
-
- (37) Dashboard side cover (See DASHBOARD SIDE COVER REMOVAL/INSTALLATION.)
-
- (38) Rear heat duct No.1 (See REAR HEAT DUCT REMOVAL/INSTALLATION [(E)].)
-
- (39) Windshield wiper arm and blade (See WINDSHIELD WIPER ARM AND BLADE REMOVAL/INSTALLATION.)
-
- (40) Cowl grille (See COWL GRILLE REMOVAL/INSTALLATION.)
-
- (41) Dashboard (See DASHBOARD REMOVAL [(E)].) (See DASHBOARD INSTALLATION [(E)].)
-
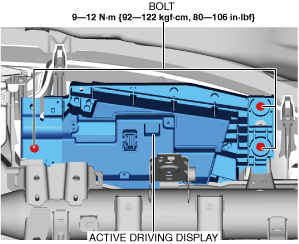
4. Remove the bolts.
5. Remove the active driving display.
6. Install in the reverse order of removal.
7. If the active driving display is replaced, perform the following procedure.
- (1) Return to the M-MDS operation and press [Continue].
-
- (2) When the M-MDS processing is completed, press [Next].
-
- (3) When the M-MDS processing is completed, press [Next].
-
- (4) Verify that the following conditions/operations are met/completed, mark the check boxes, and then press [Next].
-
-
• Ignition is switched ON (engine off)
• Install battery charger to vehicle
• Battery voltage: 11.6 V or more
• Connect power cable to M-MDS
• Front doors on both sides and trunk lid (4SD) or liftgate (5HB) are open
- (5) Press [Finish].
-
- (6) Switch the ignition OFF.
-
- (7) Switch the ignition ON (engine off) to complete global central configuration (GCC) for the active driving display.
-
- (8) Clear the DTC. (See CLEARING DTC.)
-