CURTAIN AIR BAG MODULE REMOVAL/INSTALLATION [TWO-STEP DEPLOYMENT CONTROL SYSTEM]
id0810b1800900
Replacement Part
|
Clip
Quantity: 1
Location of use: Curtain air bag module
|
-
Warning
-
-
Note
-
• The SRS air bag system can be identified by whether or not the seat track position sensor is present.
-
― Standard deployment control system: Without seat track position sensor
― Two-step deployment control system: With seat track position sensor
4SD
1. Switch the ignition to off.
2. Disconnect the negative battery terminal and wait for 1 min or more. (See NEGATIVE BATTERY TERMINAL DISCONNECTION/CONNECTION.)
3. Remove the following parts:
- (1) Sunroof seaming welt (with sunroof system) (See SUNROOF UNIT REMOVAL/INSTALLATION.)
-
- (2) A-pillar trim (See A-PILLAR TRIM REMOVAL/INSTALLATION.)
-
- (3) Sunvisor (See SUNVISOR REMOVAL/INSTALLATION.)
-
- (4) Front map light (See MAP LIGHT REMOVAL/INSTALLATION.)
-
- (5) Assist handle (See ASSIST HANDLE REMOVAL/INSTALLATION.)
-
- (6) Front scuff plate (See FRONT SCUFF PLATE REMOVAL/INSTALLATION.)
-
- (7) Front side trim (RH) (See FRONT SIDE TRIM REMOVAL/INSTALLATION.)
-
- (8) Rear scuff plate (See REAR SCUFF PLATE REMOVAL/INSTALLATION.)
-
- (9) Glove compartment (See GLOVE COMPARTMENT REMOVAL/INSTALLATION.)
-
- (10) Dashboard under cover (See DASHBOARD UNDER COVER REMOVAL/INSTALLATION.)
-
- (11) Passenger-side lower panel (See LOWER PANEL REMOVAL/INSTALLATION.)
-
- (12) B-pillar lower trim (See B-PILLAR LOWER TRIM REMOVAL/INSTALLATION.)
-
- (13) Adjust anchor cover (See FRONT SEAT BELT REMOVAL/INSTALLATION.)
-
- (14) Upper anchor installation bolt on the seat belt (See FRONT SEAT BELT REMOVAL/INSTALLATION.)
-
- (15) B-pillar upper trim (See B-PILLAR UPPER TRIM REMOVAL/INSTALLATION.)
-
- (16) Rear seat cushion (See REAR SEAT CUSHION REMOVAL/INSTALLATION.)
-
- (17) Rear seat side back (See REAR SEAT SIDE BACK REMOVAL/INSTALLATION.)
-
- (18) Tire house trim (See TIRE HOUSE TRIM REMOVAL/INSTALLATION.)
-
- (19) C-pillar trim (See C-PILLAR TRIM REMOVAL/INSTALLATION.)
-
- (20) Side wall (See SIDE WALL REMOVAL/INSTALLATION.)
-
- (21) Selector lever knob (ATX) (See AUTOMATIC TRANSAXLE SHIFT MECHANISM REMOVAL/INSTALLATION.)
-
- (22) Shift lever knob (MTX) (See MANUAL TRANSAXLE SHIFT MECHANISM REMOVAL/INSTALLATION [C66M-R].)
-
- (23) Shift panel (See SHIFT PANEL REMOVAL/INSTALLATION.)
-
- (24) Front console box (See FRONT CONSOLE BOX REMOVAL/INSTALLATION.)
-
- (25) Rear console component (See REAR CONSOLE REMOVAL/INSTALLATION.)
-
- (26) Headliner (See HEADLINER REMOVAL/INSTALLATION.)
-
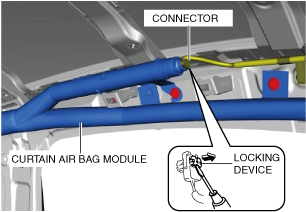
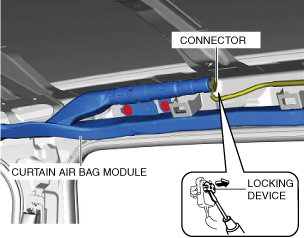
4. Using a flathead screwdriver, lift the locking device carefully, however do not remove it.
5. Disconnect the connector.
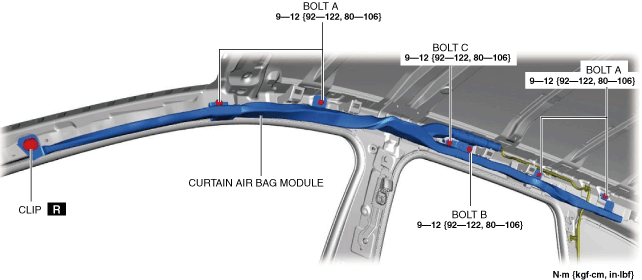
6. Remove the clip. (See 4SD.)
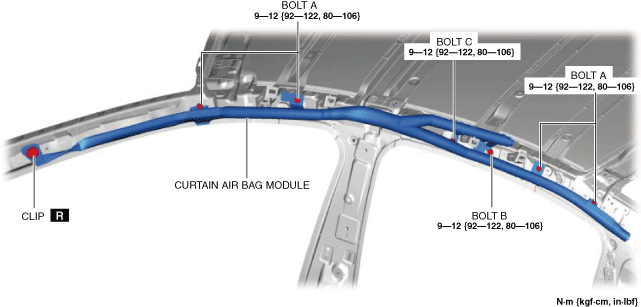
7. Remove bolts A.
8. Remove bolt B.
9. Remove bolt C.
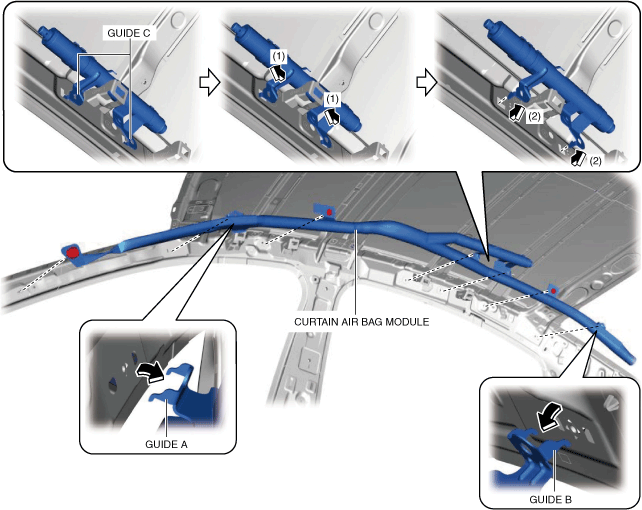
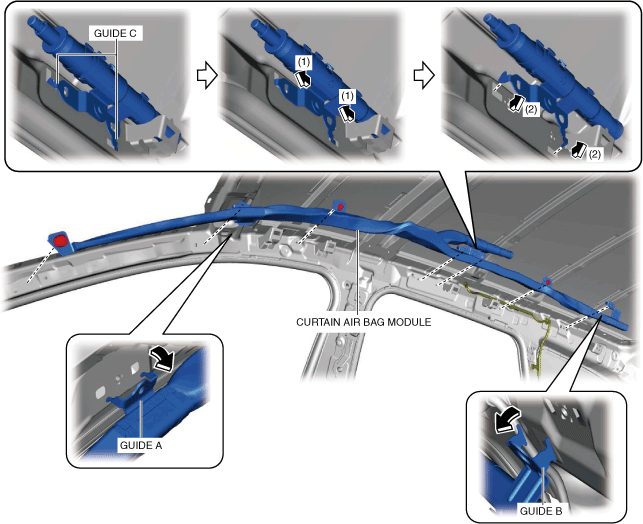
10. Move guide A in the direction of arrow shown in the figure and remove it from the body.
11. Move guide B in the direction of arrow shown in the figure and remove it from the body.
12. Move guide C in the order of arrows (1) and (2) shown in the figure and remove it from the body.
13. Remove the curtain air bag module.
14. Install in the reverse order of removal.
15. Switch the ignition ON (engine off or on).
16. Verify that the air bag/seat belt pre-tensioner system warning light illuminates for approx. 6 s and turns off.
-
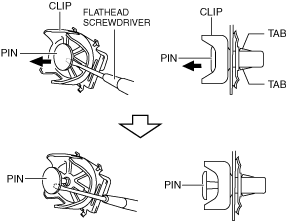
Clip removal note
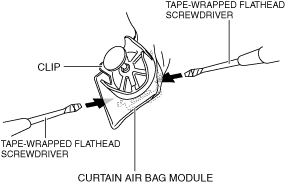
1. Pull out the pin with flathead screwdriver as shown in the figure.
2. Insert a tape-wrapped flathead screwdriver into the positions of the arrows shown in the figure.
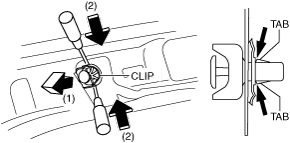
3. While pulling the curtain air bag in the direction of the arrow shown in the figure (1), detach tabs by prying with a flathead screwdriver in the direction of the arrow (2).
4. Remove the clip from the body.
WGN
1. Switch the ignition to off.
2. Disconnect the negative battery terminal and wait for 1 min or more. (See NEGATIVE BATTERY TERMINAL DISCONNECTION/CONNECTION.)
3. Remove the following parts:
- (1) Sunroof seaming welt (with sunroof system) (See SUNROOF UNIT REMOVAL/INSTALLATION.)
-
- (2) A-pillar trim (See A-PILLAR TRIM REMOVAL/INSTALLATION.)
-
- (3) Sunvisor (See SUNVISOR REMOVAL/INSTALLATION.)
-
- (4) Front map light (See MAP LIGHT REMOVAL/INSTALLATION.)
-
- (5) Assist handle (See ASSIST HANDLE REMOVAL/INSTALLATION.)
-
- (6) Front scuff plate (See FRONT SCUFF PLATE REMOVAL/INSTALLATION.)
-
- (7) Front side trim (RH) (See FRONT SIDE TRIM REMOVAL/INSTALLATION.)
-
- (8) Rear scuff plate (See REAR SCUFF PLATE REMOVAL/INSTALLATION.)
-
- (9) B-pillar lower trim (See B-PILLAR LOWER TRIM REMOVAL/INSTALLATION.)
-
- (10) Adjust anchor cover (See FRONT SEAT BELT REMOVAL/INSTALLATION.)
-
- (11) Upper anchor installation bolt on the seat belt (See FRONT SEAT BELT REMOVAL/INSTALLATION.)
-
- (12) B-pillar upper trim (See B-PILLAR UPPER TRIM REMOVAL/INSTALLATION.)
-
- (13) Rear seat cushion (See REAR SEAT CUSHION REMOVAL/INSTALLATION.)
-
- (14) Rear seat belt lower anchor installation bolt (See REAR SEAT BELT REMOVAL/INSTALLATION.)
-
- (15) Trunk board (See TRUNK BOARD REMOVAL/INSTALLATION.)
-
- (16) Trunk side pocket (See TRUNK SIDE POCKET REMOVAL/INSTALLATION.)
-
- (17) Trunk end trim (See TRUNK END TRIM REMOVAL/INSTALLATION.)
-
- (18) Trunk side upper trim (See TRUNK SIDE UPPER TRIM REMOVAL/INSTALLATION.)
-
- (19) C-pillar trim (See C-PILLAR TRIM REMOVAL/INSTALLATION.)
-
- (20) D-pillar trim (See D-PILLAR TRIM REMOVAL/INSTALLATION.)
-
- (21) Headliner (See HEADLINER REMOVAL/INSTALLATION.)
-
4. Using a flathead screwdriver, lift the locking device carefully, however do not remove it.
5. Disconnect the connector.
6. Remove the clip. (See Clip removal note.)
7. Remove bolts A.
8. Remove bolt B.
9. Remove bolt C.
10. Move guide A in the direction of arrow shown in the figure and remove it from the body.
11. Move guide B in the direction of arrow shown in the figure and remove it from the body.
12. Move guide C in the order of arrows (1) and (2) shown in the figure and remove it from the body.
13. Remove the curtain air bag module.
14. Install in the reverse order of removal.
15. Switch the ignition ON (engine off or on).
16. Verify that the air bag/seat belt pre-tensioner system warning light illuminates for approx. 6 s and turns off.
-
Clip removal note
1. Pull out the pin with flathead screwdriver as shown in the figure.
2. Insert a tape-wrapped flathead screwdriver into the positions of the arrows shown in the figure.
3. While pulling the curtain air bag in the direction of the arrow shown in the figure (1), detach tabs by prying with a flathead screwdriver in the direction of the arrow (2).
4. Remove the clip from the body.