VANITY MIRROR ILLUMINATION REMOVAL/INSTALLATION
id091800820100
1. Disconnect the negative battery terminal. (See NEGATIVE BATTERY TERMINAL DISCONNECTION/CONNECTION.)
2. Remove the following parts:
- (1) Sunroof seaming welt (with sunroof system) (See SUNROOF UNIT REMOVAL/INSTALLATION.)
-
- (2) A-pillar trim (See A-PILLAR TRIM REMOVAL/INSTALLATION.)
-
- (3) Front map light (See FRONT MAP LIGHT REMOVAL/INSTALLATION.)
-
- (4) Sunvisor (See SUNVISOR REMOVAL/INSTALLATION.)
-
- (5) Assist handle (See ASSIST HANDLE REMOVAL/INSTALLATION.)
-
- (6) Front scuff plate (See FRONT SCUFF PLATE REMOVAL/INSTALLATION.)
-
- (7) Driver-side front side trim (See FRONT SIDE TRIM REMOVAL/INSTALLATION.)
-
- (8) Lower decoration panel (See DECORATION PANEL REMOVAL/INSTALLATION.)
-
- (9) Bonnet release lever (See BONNET RELEASE LEVER AND RELEASE CABLE REMOVAL/INSTALLATION.)
-
- (10) Fuel-filler lid opener lever (See FUEL-FILLER LID OPENER AND LEVER REMOVAL/INSTALLATION.)
-
- (11) Driver-side lower panel (See LOWER PANEL REMOVAL/INSTALLATION.)
-
- (12) Rear scuff plate (See REAR SCUFF PLATE REMOVAL/INSTALLATION.)
-
- (13) B-pillar lower trim (See B-PILLAR LOWER TRIM REMOVAL/INSTALLATION.)
-
- (14) Adjust anchor cover on the front seat belt (See FRONT SEAT BELT REMOVAL/INSTALLATION.)
-
- (15) Upper anchor installation bolt on the front seat belt (See FRONT SEAT BELT REMOVAL/INSTALLATION.)
-
- (16) B-pillar upper trim (See B-PILLAR UPPER TRIM REMOVAL/INSTALLATION.)
-
- (17) Trunk board (See TRUNK BOARD REMOVAL/INSTALLATION.)
-
- (18) Trunk covering (See TRUNK COVERING REMOVAL/INSTALLATION.)
-
- (19) Trunk side pocket (See TRUNK SIDE POCKET REMOVAL/INSTALLATION.)
-
- (20) Trunk end trim (See TRUNK END TRIM REMOVAL/INSTALLATION.)
-
- (21) Bass-box (with Bose®) (See BASS-BOX REMOVAL/INSTALLATION.)
-
- (22) Third-row seat cushion (See THIRD-ROW SEAT CUSHION REMOVAL/INSTALLATION.)
-
- (23) Third-row seat back component (See THIRD-ROW SEAT BACK COMPONENT REMOVAL/INSTALLATION.)
-
- (24) Trunk side trim (See TRUNK SIDE TRIM REMOVAL/INSTALLATION.)
-
- (25) D-pillar trim (See D-PILLAR TRIM REMOVAL/INSTALLATION.)
-
- (26) C-pillar trim (See C-PILLAR TRIM REMOVAL/INSTALLATION.)
-
- (27) Headliner (See HEADLINER REMOVAL/INSTALLATION.)
-
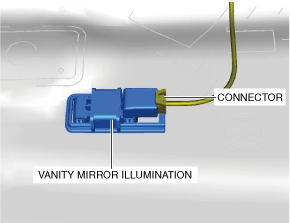
3. Disconnect the connector.
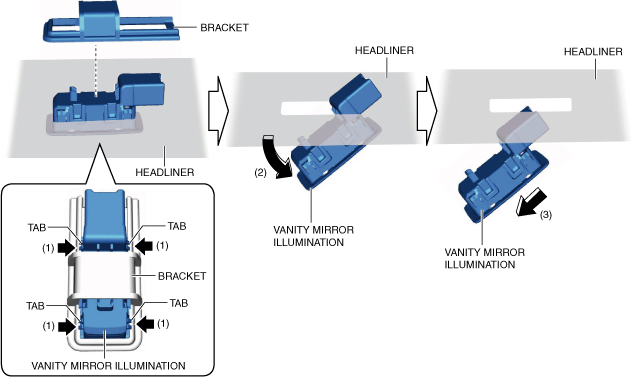
4. Remove the bracket while pressing the vanity mirror illumination tabs (1).
-
Caution
-
• If the vanity mirror illumination is removed from the bracket, the vanity mirror illumination may fall off and be damaged. When removing the vanity mirror illumination from the bracket, hold the vanity mirror illumination on the lens side with a hand during servicing.
5. Move the vanity mirror illumination in the direction of the arrow (2), (3) and remove the vanity mirror illumination from the headliner.
6. Install in the reverse order of removal.