FRONT DRAIN HOSE REMOVAL/INSTALLATION
id091500443800
Driver-side
L.H.D.
1. Disconnect the negative battery terminal. (See NEGATIVE BATTERY TERMINAL DISCONNECTION/CONNECTION.)
2. Remove the following parts:
- (1) Sunroof seaming welt (See SUNROOF UNIT REMOVAL/INSTALLATION.)
-
- (2) A-pillar trim (See A-PILLAR TRIM REMOVAL/INSTALLATION.)
-
- (3) Front map light (See FRONT MAP LIGHT REMOVAL/INSTALLATION.)
-
- (4) Sunvisor (See SUNVISOR REMOVAL/INSTALLATION.)
-
- (5) Lower decoration panel (See DECORATION PANEL REMOVAL/INSTALLATION.)
-
- (6) Front scuff plate (See FRONT SCUFF PLATE REMOVAL/INSTALLATION.)
-
- (7) Front side trim (See FRONT SIDE TRIM REMOVAL/INSTALLATION.)
-
- (8) Bonnet release lever (See BONNET RELEASE LEVER AND RELEASE CABLE REMOVAL/INSTALLATION.)
-
- (9) Fuel-filler lid opener lever (See FUEL-FILLER LID OPENER AND LEVER REMOVAL/INSTALLATION.)
-
- (10) Driver-side lower panel (See LOWER PANEL REMOVAL/INSTALLATION.)
-
- (11) Glove compartment (With center display) (See GLOVE COMPARTMENT REMOVAL/INSTALLATION.)
-
- (12) Dashboard under cover (With center display) (See DASHBOARD UNDER COVER REMOVAL/INSTALLATION.)
-
- (13) Passenger-side lower panel (With center display) (See LOWER PANEL REMOVAL/INSTALLATION.)
-
- (14) Assist handle (See ASSIST HANDLE REMOVAL/INSTALLATION.)
-
- (15) Rear scuff plate (See REAR SCUFF PLATE REMOVAL/INSTALLATION.)
-
- (16) B-pillar lower trim (See B-PILLAR LOWER TRIM REMOVAL/INSTALLATION.)
-
- (17) Adjust anchor cover on the front seat belt (See FRONT SEAT BELT REMOVAL/INSTALLATION.)
-
- (18) Upper anchor installation bolt on the front seat belt (See FRONT SEAT BELT REMOVAL/INSTALLATION.)
-
- (19) B-pillar upper trim (See B-PILLAR UPPER TRIM REMOVAL/INSTALLATION.)
-
- (20) Rear seat cushion (See REAR SEAT CUSHION REMOVAL/INSTALLATION.)
-
- (21) Tonneau cover (With tonneau cover) (See TONNEAU COVER REMOVAL/INSTALLATION.)
-
- (22) Trunk board (See TRUNK BOARD REMOVAL/INSTALLATION.)
-
- (23) Bass-box (With Bose®) (See BASS-BOX REMOVAL/INSTALLATION.)
-
- (24) Sub-trunk (See SUB-TRUNK REMOVAL/INSTALLATION.)
-
- (25) Trunk end trim (See TRUNK END TRIM REMOVAL/INSTALLATION.)
-
- (26) Trunk side trim (See TRUNK SIDE TRIM REMOVAL/INSTALLATION.)
-
- (27) C-pillar trim (See C-PILLAR TRIM REMOVAL/INSTALLATION.)
-
- (28) Head restraint
-
- (29) Headliner (See HEADLINER REMOVAL/INSTALLATION.)
-
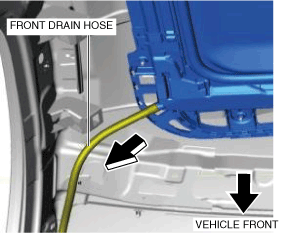
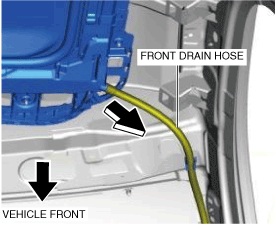
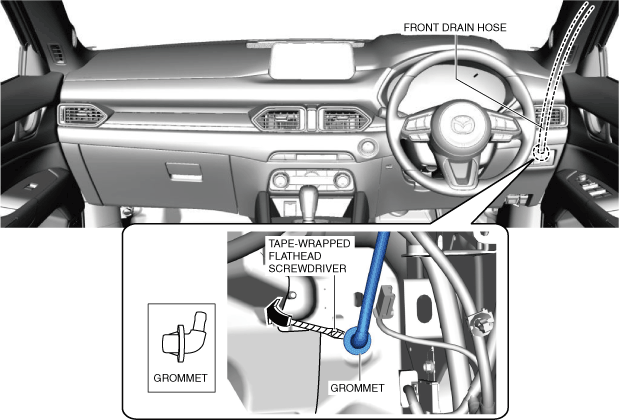
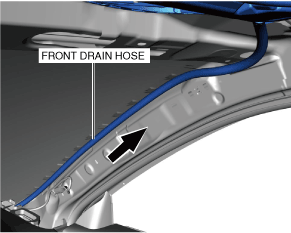
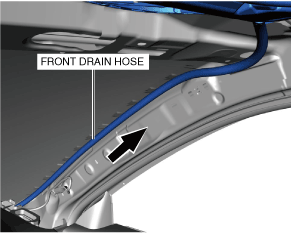
3. Disconnect the front drain hose in the direction of the arrow shown in the figure.
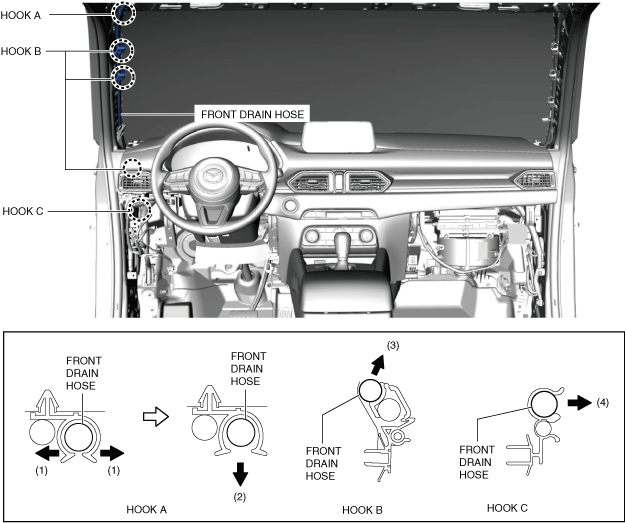
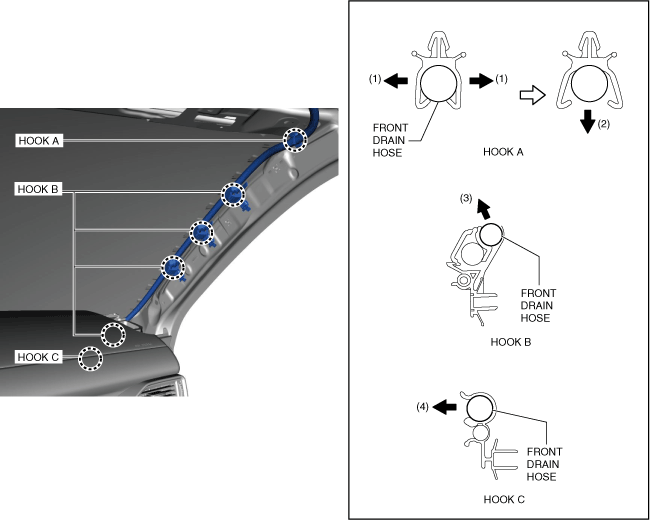
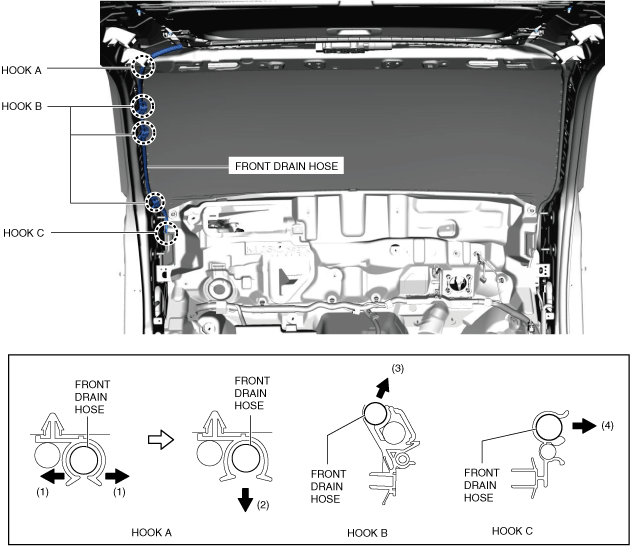
4. Spread hook A in the directions of arrows (1), pull the front drain hose in the direction of arrow (2), and remove it from hook A.
5. Pull the front drain hose in the direction of arrow (3) shown in the figure and remove it from hooks B.
6. Pull the front drain hose in the direction of arrow (4) shown in the figure and remove it from hook C.
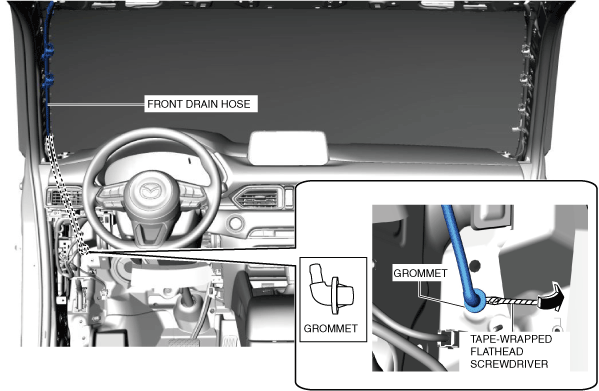
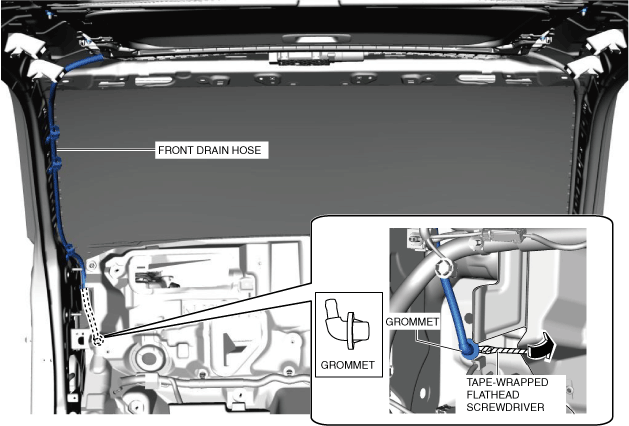
7. Partially peel back the dashboard lower insulator and insert a tape-wrapped flathead screwdriver into the position shown in the figure.
8. Move the tape-wrapped flathead screwdriver in the direction of the arrow shown in the figure and remove the grommet.
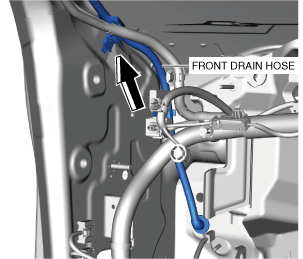
9. Pull the front drain hose from the A-pillar side and pull it out in the direction of the arrow shown in the figure.
10. Install in the reverse order of removal.
R.H.D.
1. Disconnect the negative battery terminal. (See NEGATIVE BATTERY TERMINAL DISCONNECTION/CONNECTION.)
2. Remove the following parts:
- (1) Sunroof seaming welt (See SUNROOF UNIT REMOVAL/INSTALLATION.)
-
- (2) A-pillar trim (See A-PILLAR TRIM REMOVAL/INSTALLATION.)
-
- (3) Front map light (See FRONT MAP LIGHT REMOVAL/INSTALLATION.)
-
- (4) Sunvisor (See SUNVISOR REMOVAL/INSTALLATION.)
-
- (5) Lower decoration panel (See DECORATION PANEL REMOVAL/INSTALLATION.)
-
- (6) Front scuff plate (See FRONT SCUFF PLATE REMOVAL/INSTALLATION.)
-
- (7) Driver-side front side trim (See FRONT SIDE TRIM REMOVAL/INSTALLATION.)
-
- (8) Bonnet release lever (See BONNET RELEASE LEVER AND RELEASE CABLE REMOVAL/INSTALLATION.)
-
- (9) Fuel-filler lid opener lever (See FUEL-FILLER LID OPENER AND LEVER REMOVAL/INSTALLATION.)
-
- (10) Driver-side lower panel (See LOWER PANEL REMOVAL/INSTALLATION.)
-
- (11) Assist handle (See ASSIST HANDLE REMOVAL/INSTALLATION.)
-
- (12) Rear scuff plate (See REAR SCUFF PLATE REMOVAL/INSTALLATION.)
-
- (13) B-pillar lower trim (See B-PILLAR LOWER TRIM REMOVAL/INSTALLATION.)
-
- (14) Adjust anchor cover on the front seat belt (See FRONT SEAT BELT REMOVAL/INSTALLATION.)
-
- (15) Upper anchor installation bolt on the front seat belt (See FRONT SEAT BELT REMOVAL/INSTALLATION.)
-
- (16) B-pillar upper trim (See B-PILLAR UPPER TRIM REMOVAL/INSTALLATION.)
-
- (17) Rear seat cushion (See REAR SEAT CUSHION REMOVAL/INSTALLATION.)
-
- (18) Tonneau cover (With tonneau cover) (See TONNEAU COVER REMOVAL/INSTALLATION.)
-
- (19) Trunk board (See TRUNK BOARD REMOVAL/INSTALLATION.)
-
- (20) Bass-box (With Bose®) (See BASS-BOX REMOVAL/INSTALLATION.)
-
- (21) Sub-trunk (See SUB-TRUNK REMOVAL/INSTALLATION.)
-
- (22) Trunk end trim (See TRUNK END TRIM REMOVAL/INSTALLATION.)
-
- (23) Trunk side trim (See TRUNK SIDE TRIM REMOVAL/INSTALLATION.)
-
- (24) C-pillar trim (See C-PILLAR TRIM REMOVAL/INSTALLATION.)
-
- (25) Head restraint
-
- (26) Headliner (See HEADLINER REMOVAL/INSTALLATION.)
-
- (27) Tuner and amp unit (TAU) (With center display) (See TUNER AND AMP UNIT (TAU) REMOVAL/INSTALLATION.)
-
3. Disconnect the front drain hose in the direction of the arrow shown in the figure.
4. Spread hook A in the directions of arrows (1), pull the front drain hose in the direction of arrow (2), and remove it from hook A.
5. Pull the front drain hose in the direction of arrow (3) shown in the figure and remove it from hooks B.
6. Pull the front drain hose in the direction of arrow (4) shown in the figure and remove it from hook C.
7. Partially peel back the dashboard lower insulator and insert a tape-wrapped flathead screwdriver into the position shown in the figure.
8. Move the tape-wrapped flathead screwdriver in the direction of the arrow shown in the figure and remove the grommet.
9. Pull the front drain hose from the A-pillar side and pull it out in the direction of the arrow shown in the figure.
10. Install in the reverse order of removal.
Passenger-side
L.H.D.
1. Disconnect the negative battery terminal. (See NEGATIVE BATTERY TERMINAL DISCONNECTION/CONNECTION.)
2. Remove the following parts:
- (1) Sunroof seaming welt (See SUNROOF UNIT REMOVAL/INSTALLATION.)
-
- (2) A-pillar trim (See A-PILLAR TRIM REMOVAL/INSTALLATION.)
-
- (3) Front map light (See FRONT MAP LIGHT REMOVAL/INSTALLATION.)
-
- (4) Sunvisor (See SUNVISOR REMOVAL/INSTALLATION.)
-
- (5) Lower decoration panel (See DECORATION PANEL REMOVAL/INSTALLATION.)
-
- (6) Front scuff plate (See FRONT SCUFF PLATE REMOVAL/INSTALLATION.)
-
- (7) Passenger-side front side trim (See FRONT SIDE TRIM REMOVAL/INSTALLATION.)
-
- (8) Glove compartment (See GLOVE COMPARTMENT REMOVAL/INSTALLATION.)
-
- (9) Dashboard under cover (See DASHBOARD UNDER COVER REMOVAL/INSTALLATION.)
-
- (10) Passenger-side lower panel (See LOWER PANEL REMOVAL/INSTALLATION.)
-
- (11) Assist handle (See ASSIST HANDLE REMOVAL/INSTALLATION.)
-
- (12) Rear scuff plate (See REAR SCUFF PLATE REMOVAL/INSTALLATION.)
-
- (13) B-pillar lower trim (See B-PILLAR LOWER TRIM REMOVAL/INSTALLATION.)
-
- (14) Adjust anchor cover on the front seat belt (See FRONT SEAT BELT REMOVAL/INSTALLATION.)
-
- (15) Upper anchor installation bolt on the front seat belt (See FRONT SEAT BELT REMOVAL/INSTALLATION.)
-
- (16) B-pillar upper trim (See B-PILLAR UPPER TRIM REMOVAL/INSTALLATION.)
-
- (17) Rear seat cushion (See REAR SEAT CUSHION REMOVAL/INSTALLATION.)
-
- (18) Tonneau cover (With tonneau cover) (See TONNEAU COVER REMOVAL/INSTALLATION.)
-
- (19) Trunk board (See TRUNK BOARD REMOVAL/INSTALLATION.)
-
- (20) Bass-box (With Bose®) (See BASS-BOX REMOVAL/INSTALLATION.)
-
- (21) Sub-trunk (See SUB-TRUNK REMOVAL/INSTALLATION.)
-
- (22) Trunk end trim (See TRUNK END TRIM REMOVAL/INSTALLATION.)
-
- (23) Trunk side trim (See TRUNK SIDE TRIM REMOVAL/INSTALLATION.)
-
- (24) C-pillar trim (See C-PILLAR TRIM REMOVAL/INSTALLATION.)
-
- (25) Head restraint
-
- (26) Headliner (See HEADLINER REMOVAL/INSTALLATION.)
-
- (27) Tuner and amp unit (TAU) (With center display) (See TUNER AND AMP UNIT (TAU) REMOVAL/INSTALLATION.)
-
3. Disconnect the front drain hose in the direction of the arrow shown in the figure.
4. Spread hook A in the directions of arrows (1) shown in the figure, move the front drain hose in the direction of arrow (2), and remove it from hook A.
5. Pull the front drain hose in the direction of arrow (3) shown in the figure and remove it from hooks B.
6. Pull the front drain hose in the direction of arrow (4) shown in the figure and remove it from hook C.
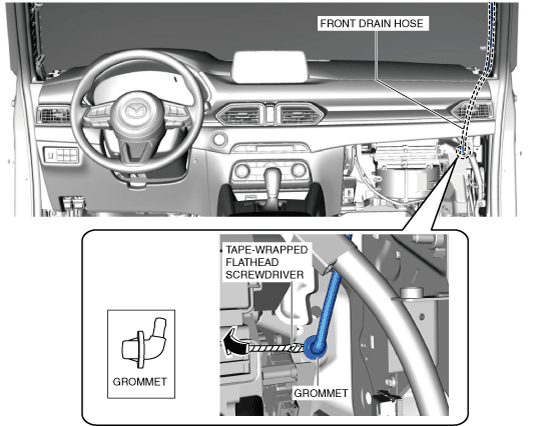
7. Partially peel back the dashboard lower insulator and insert a tape-wrapped flathead screwdriver into the position shown in the figure.
8. Move the tape-wrapped flathead screwdriver in the direction of the arrow shown in the figure and remove the grommet.
9. Pull the front drain hose from the A-pillar side and pull it out in the direction of the arrow shown in the figure.
10. Install in the reverse order of removal.
R.H.D.
1. Disconnect the negative battery terminal. (See NEGATIVE BATTERY TERMINAL DISCONNECTION/CONNECTION.)
2. Remove the following parts:
- (1) Windshield wiper arm and blade (See WINDSHIELD WIPER ARM AND BLADE REMOVAL/INSTALLATION.)
-
- (2) Cowl grille (See COWL GRILLE REMOVAL/INSTALLATION.)
-
- (3) Sunroof seaming welt (See SUNROOF UNIT REMOVAL/INSTALLATION.)
-
- (4) A-pillar trim (See A-PILLAR TRIM REMOVAL/INSTALLATION.)
-
- (5) Front map light (See FRONT MAP LIGHT REMOVAL/INSTALLATION.)
-
- (6) Sunvisor (See SUNVISOR REMOVAL/INSTALLATION.)
-
- (7) Driver-side air bag module (See DRIVER-SIDE AIR BAG MODULE REMOVAL [STANDARD DEPLOYMENT CONTROL SYSTEM].) (See DRIVER-SIDE AIR BAG MODULE REMOVAL [TWO-STEP DEPLOYMENT CONTROL SYSTEM].)
-
- (8) Steering wheel (See STEERING WHEEL AND COLUMN REMOVAL/INSTALLATION.)
-
- (9) Upper column cover (See COLUMN COVER REMOVAL/INSTALLATION.)
-
- (10) Lower column cover (See COLUMN COVER REMOVAL/INSTALLATION.)
-
- (11) Lower decoration panel (See DECORATION PANEL REMOVAL/INSTALLATION.)
-
- (12) Upper decoration panel (See DECORATION PANEL REMOVAL/INSTALLATION.)
-
- (13) Driver-side decoration panel (See DECORATION PANEL REMOVAL/INSTALLATION.)
-
- (14) Meter hood No.1 (See METER HOOD REMOVAL/INSTALLATION.)
-
- (15) Center display component (With center display) (See CENTER DISPLAY REMOVAL/INSTALLATION.)
-
- (16) Instrument cluster (See INSTRUMENT CLUSTER REMOVAL/INSTALLATION.)
-
- (17) Meter hood No.2 (With active driving display) (See METER HOOD REMOVAL/INSTALLATION.)
-
- (18) Active driving display (With active driving display) (See ACTIVE DRIVING DISPLAY REMOVAL/INSTALLATION.)
-
- (19) Front scuff plate (See FRONT SCUFF PLATE REMOVAL/INSTALLATION.)
-
- (20) Front side trim (See FRONT SIDE TRIM REMOVAL/INSTALLATION.)
-
- (21) Console side panel (See CONSOLE SIDE PANEL REMOVAL/INSTALLATION.)
-
- (22) Switch panel (See SWITCH PANEL REMOVAL/INSTALLATION.)
-
- (23) Cup holder (See CUP HOLDER REMOVAL/INSTALLATION.)
-
- (24) Shift lever knob (MTX) (See SHIFT LEVER REMOVAL/INSTALLATION [C66M-R, C66MX-R].) (See SHIFT LEVER REMOVAL/INSTALLATION [D66M-R, D66MX-R].)
-
- (25) Selector lever knob (ATX) (See SELECTOR LEVER COMPONENT REMOVAL/INSTALLATION.)
-
- (26) Shift panel (See SHIFT PANEL REMOVAL/INSTALLATION.)
-
- (27) Front console box (See FRONT CONSOLE BOX REMOVAL/INSTALLATION.)
-
- (28) Side wall (See SIDE WALL REMOVAL/INSTALLATION.)
-
- (29) Rear console (See REAR CONSOLE REMOVAL/INSTALLATION.)
-
- (30) DCM control module component (See MAZDA ERA-GLONASS CONTROL MODULE REMOVAL/INSTALLATION.)
-
- (31) Bonnet release lever (See BONNET RELEASE LEVER AND RELEASE CABLE REMOVAL/INSTALLATION.)
-
- (32) Fuel-filler lid opener lever (See FUEL-FILLER LID OPENER AND LEVER REMOVAL/INSTALLATION.)
-
- (33) Driver-side lower panel (See LOWER PANEL REMOVAL/INSTALLATION.)
-
- (34) Center lower panel (See CENTER LOWER PANEL REMOVAL/INSTALLATION.)
-
- (35) Indicator unit (See INDICATOR UNIT REMOVAL/INSTALLATION.)
-
- (36) Climate control unit (See CLIMATE CONTROL UNIT REMOVAL/INSTALLATION [FULL-AUTO AIR CONDITIONER].) (See CLIMATE CONTROL UNIT REMOVAL/INSTALLATION [MANUAL AIR CONDITIONER].)
-
- (37) Glove compartment (See GLOVE COMPARTMENT REMOVAL/INSTALLATION.)
-
- (38) Dashboard under cover (See DASHBOARD UNDER COVER REMOVAL/INSTALLATION.)
-
- (39) Passenger-side lower panel (See LOWER PANEL REMOVAL/INSTALLATION.)
-
- (40) Clock spring (See CLOCK SPRING REMOVAL/INSTALLATION [STANDARD DEPLOYMENT CONTROL SYSTEM].) (See CLOCK SPRING REMOVAL/INSTALLATION [TWO-STEP DEPLOYMENT CONTROL SYSTEM].)
-
- (41) Wiper and washer switch (See WIPER AND WASHER SWITCH REMOVAL/INSTALLATION.)
-
- (42) Light switch (See LIGHT SWITCH REMOVAL/INSTALLATION.)
-
- (43) Steering wheel and column component (See STEERING WHEEL AND COLUMN REMOVAL/INSTALLATION.)
-
- (44) Rear vent duct No.2 (With rear vent duct) (See REAR VENT DUCT REMOVAL/INSTALLATION.)
-
- (45) Rear vent duct No.1 (With rear vent duct) (See REAR VENT DUCT REMOVAL/INSTALLATION.)
-
- (46) Shift lever component (MTX) (See SHIFT LEVER REMOVAL/INSTALLATION [C66M-R, C66MX-R].) (See SHIFT LEVER REMOVAL/INSTALLATION [D66M-R, D66MX-R].)
-
- (47) Selector lever component (ATX) (See SELECTOR LEVER COMPONENT REMOVAL/INSTALLATION.)
-
- (48) Dashboard (See DASHBOARD REMOVAL/INSTALLATION.)
-
- (49) Passenger-side front heat duct (See FRONT HEAT DUCT REMOVAL/INSTALLATION.)
-
- (50) Blower unit (See BLOWER UNIT REMOVAL/INSTALLATION.)
-
- (51) Assist handle (See ASSIST HANDLE REMOVAL/INSTALLATION.)
-
- (52) Rear scuff plate (See REAR SCUFF PLATE REMOVAL/INSTALLATION.)
-
- (53) B-pillar lower trim (See B-PILLAR LOWER TRIM REMOVAL/INSTALLATION.)
-
- (54) Adjust anchor cover on the front seat belt (See FRONT SEAT BELT REMOVAL/INSTALLATION.)
-
- (55) Upper anchor installation bolt on the front seat belt (See FRONT SEAT BELT REMOVAL/INSTALLATION.)
-
- (56) B-pillar upper trim (See B-PILLAR UPPER TRIM REMOVAL/INSTALLATION.)
-
- (57) Rear seat cushion (See REAR SEAT CUSHION REMOVAL/INSTALLATION.)
-
- (58) Tonneau cover (With tonneau cover) (See TONNEAU COVER REMOVAL/INSTALLATION.)
-
- (59) Trunk board (See TRUNK BOARD REMOVAL/INSTALLATION.)
-
- (60) Bass-box (With Bose®) (See BASS-BOX REMOVAL/INSTALLATION.)
-
- (61) Sub-trunk (See SUB-TRUNK REMOVAL/INSTALLATION.)
-
- (62) Trunk end trim (See TRUNK END TRIM REMOVAL/INSTALLATION.)
-
- (63) Trunk side trim (See TRUNK SIDE TRIM REMOVAL/INSTALLATION.)
-
- (64) C-pillar trim (See C-PILLAR TRIM REMOVAL/INSTALLATION.)
-
- (65) Head restraint
-
- (66) Headliner (See HEADLINER REMOVAL/INSTALLATION.)
-
3. Disconnect the front drain hose in the direction of the arrow shown in the figure.
4. Spread hook A in the directions of arrows (1) shown in the figure, move the front drain hose in the direction of arrow (2), and remove it from hook A.
5. Pull the front drain hose in the direction of arrow (3) shown in the figure and remove it from hooks B.
6. Pull the front drain hose in the direction of arrow (4) shown in the figure and remove it from hook C.
7. Partially peel back the dashboard lower insulator and insert a tape-wrapped flathead screwdriver into the position shown in the figure.
8. Move the tape-wrapped flathead screwdriver in the direction of the arrow shown in the figure and remove the grommet.
9. Pull the front drain hose from the A-pillar side and pull it out in the direction of the arrow shown in the figure.
10. Install in the reverse order of removal.